I absolutely love guavas! Their sweetness, aroma, and nutrient content make them a top choice. But have you ever tried guava juice? It’s a refreshing and healthy way to enjoy this exotic fruit. In this article, I will show you how to juice a guava and share tips to make the juicing process easier.
First, you’ll need to gather your ingredients and equipment. You’ll need fresh guavas, a juicer, a knife, a cutting board, and a pitcher to collect the juice. Make sure your guavas are ripe and ready to be juiced. You can tell they are ripe when they are soft to the touch and give off a sweet aroma.
Once you have everything ready, it’s time to start juicing!
Key Takeaways
- Guava juice is a refreshing and healthy way to enjoy this tropical fruit, which is sweet, fragrant, and packed with nutrients.
- To make guava juice, you’ll need fresh guavas, a juicer, a knife, a cutting board, and a pitcher to collect the juice. It’s important to make sure all the fruit is processed when juicing, and you can add additional ingredients like lime juice or salt to enhance the flavor.
- Guava juice is an excellent source of hydration and contains essential vitamins and minerals, including four times more vitamin C than an orange. It’s particularly good for people with digestive issues such as bloating, constipation, and diarrhea, thanks to its high fiber content and digestive enzymes.
- Homemade guava juice is easy to make and a delicious way to enjoy this tropical fruit. You can experiment with different juice flavors and cocktail recipes to find the perfect guava drink, including variations like classic, creamy, spicy, citrusy, and tropical flavors.

ChefWave Milkmade Plant-Based Milk Maker, 6-in-1 Nut Milk Machine for Almond, Oat, Soy, Cashew, Coconut & Macadamia — 1000W, No Soaking, Auto Self-Clean, Delay Start, Glass Pitcher Included (White)
FRESH NUT MILK IN UNDER 16 MINUTES - NO SOAKING, NO STRAINING - Simply add water and your...
As an affiliate, we earn on qualifying purchases.
Gather Your Ingredients and Equipment
You’ll need a few things before you can start juicing that delicious guava – gather up your ingredients and equipment!
First, you’ll need to have all of the equipment essentials on hand. This includes a juicer or blender, a knife and cutting board, and a measuring cup. You may also want to have a strainer or cheesecloth available to remove any pulp or seeds from the juice.
In addition to the equipment, you’ll need to have the guava fruit itself. Make sure to select ripe guavas that are soft to the touch. You can use any guava juice recipes you like, but for a basic juice, you’ll only need a few guavas.
Now that you have everything ready, it’s time to get started! Wash and cut your guavas into small pieces to prepare them for juicing.

50.73oz Nut Milk Maker Machine: 12 in 1 Automatic Soy Milk Maker with Detachable Design, Homemade Juice,Almond,Oat Milks for Plant Based Milks, 24H Delay Start/Keep Warm/Auto-Clean/Safety Lock
Fresh Homemade Nut Milk in Minutes - No Additives, No Worries: Make healthy, dairy-free milk at home in...
As an affiliate, we earn on qualifying purchases.
Wash and Cut Your Guavas
Before cutting your ripe guavas, make sure to rinse them under cold water and gently scrub away any dirt or debris. Preparation tips are important when it comes to juicing guavas, and cleaning them is the first step.
Once they’re clean, you can begin cutting them into smaller pieces that’ll fit into your juicer. There are different cutting styles you can use, depending on your preference and the type of juicer you have.
One option is to simply cut your guavas in half and scoop out the flesh with a spoon. This is a great option if you have a manual juicer or if you prefer a thicker, pulpier juice.
Another option is to slice them into smaller pieces, which works well for electric juicers. You can also remove the skin before juicing, although this isn’t necessary.
With your guavas washed and cut, you’re ready to start juicing and enjoying all the health benefits of this delicious fruit.

10 in 1 Automatic Nut Milk Maker, Soy Milk Machine,Almond Milk Machine
【One-Touch Start】With a simple and intuitive interface, the soymilk machine maker is easy to use for both beginners...
As an affiliate, we earn on qualifying purchases.
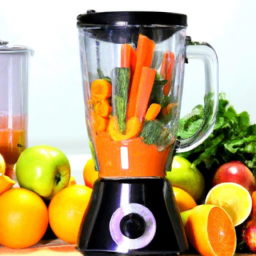
Start Juicing
I’m now ready to start juicing my guavas. I’ll begin by feeding the sliced guavas into my juicer.
It’s important to make sure all the fruit is processed, so I’ll keep pushing it through until I’m left with just the pulp.
Once all the juice has been collected, I’ll be ready to enjoy a refreshing glass of guava juice.
Feed the Guava Slices into the Juicer
Now it’s time to start juicing those delicious guava slices, so get ready to experience a burst of tropical flavor with every sip! To feed the guava slices into the juicer, follow these simple steps:
-
Take a handful of guava slices and place them into the juicer’s feeding chute. Make sure to push them in gently but firmly, to avoid damaging the juicer’s blades.
-
Use the juicing techniques that work best for your particular juicer. For example, some juicers may require you to move the guava slices around a bit to ensure they get fully juiced, while others may require you to press down on the feeding chute to help the guava slices get through the juicer.
-
Don’t forget to clean your juicer regularly to ensure optimal juicing performance. Refer to your juicer’s manual for specific maintenance instructions.
After you’ve fed all of your guava slices through the juicer, it’s time to collect the juice.
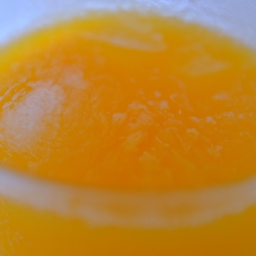
Collect the Juice
Once all the slices have been juiced, the liquid will flow out of the spout and into your collection container.
It’s important to use a strainer to remove any pulp or seeds that may have made their way into the juice. This will ensure a smooth and enjoyable drinking experience.
From here, you can simply enjoy your freshly squeezed guava juice or get creative by creating guava juice blends. Some popular additions include pineapple, mango, and lime.
In the next section, we’ll discuss how to add additional ingredients (optional) to your guava juice to create a unique and delicious drink.

Nama M1 Plant Milk Maker – Homemade Oat, Seed, & Nut Milk Maker Machine – Smooth, Creamy Texture Barista Quality Milk in Minutes – Blends & Strains in One Container – Easy to Clean
CONTROL YOUR INGREDIENTS: Create fresh, homemade plant-based milk with the M1 plant-based milk maker. Use nuts, seeds, or...
As an affiliate, we earn on qualifying purchases.
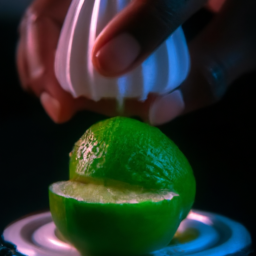
Add Additional Ingredients (Optional)
To enhance the flavor of your guava juice, you can try adding a splash of lime juice or a sprinkle of salt. These creative combinations can take your guava juice to the next level and add a unique twist to the classic flavor.
Flavor experimentation is a fun and exciting part of the juicing process. Don’t be afraid to try different combinations of ingredients to find the perfect flavor profile that suits your taste buds. With a little bit of experimentation, you can create a refreshing and delicious guava juice that will impress your friends and family.
Now that your juice’s ready, it’s time to serve and enjoy!
Serve and Enjoy
Now that I’ve juiced my guavas and added any additional ingredients, it’s time to serve and enjoy!
First, I like to chill the juice in the refrigerator for at least an hour to make it nice and cold.
Then, I garnish each glass with fresh fruits or herbs, such as a slice of lime or a sprig of mint, for an extra pop of flavor and a beautiful presentation.
Finally, I sit back, relax, and savor the delicious taste of my homemade guava juice.
Chill the Juice
Chilling your guava juice is essential for a refreshing and satisfying sip. Not only does it enhance the taste, but it also offers several benefits that make it a perfect summer drink. When served chilled, guava juice helps regulate body temperature, boosts immunity, and aids in digestion. It is also an excellent source of hydration and contains essential vitamins and minerals that keep you energized throughout the day.
If you don’t have a juicer, making guava juice at home is still easy. Simply blend ripe guava fruits with a little water and strain the mixture through a sieve or cheesecloth. Once the juice is ready, transfer it to a pitcher or glass bottle and refrigerate for at least an hour. To serve, pour the chilled juice into a tall glass and garnish with fresh fruits or herbs for an extra burst of flavor.
Garnish with Fresh Fruits or Herbs
When you want to take your guava drink to the next level, try adding a burst of flavor with fresh fruits or herbs. Garnishing your guava juice not only adds a visual appeal, but also enhances the taste with complementary flavors.
Here are some garnish ideas and flavor combinations you can try:
- For a tropical twist, add a slice of fresh pineapple or mango to your guava juice. These fruits beautifully complement guava and add a sweet and tangy flavor to your drink.
- Alternatively, you can add a sprig of fresh mint or basil for a refreshing and herbaceous note.
- Lemon or lime wedges can also be used to add a zesty kick to your guava juice.
To store leftover juice, transfer it into an airtight container and refrigerate for up to two days. When ready to drink, give it a quick stir as the juice may settle over time.
Now that your guava juice is ready, it’s time to sit back, relax, and enjoy the delicious flavors with a beautiful garnish of your choice.
Store Leftover Juice
When I have leftover guava juice, I make sure to store it properly to keep it fresh and delicious. I always use airtight containers to prevent air from getting in and spoiling the juice.
Then, I refrigerate the juice to extend its shelf life or freeze it for longer storage. By following these simple steps, I can enjoy my guava juice for days to come.
Use Airtight Containers
To keep your guava juice fresh for longer, seal it in an airtight container before storing it in the fridge. Airtight containers are beneficial because they prevent air from getting in and oxidizing the juice, which can cause it to spoil quickly. Additionally, these containers keep the juice’s flavor and nutrients intact, ensuring that you get the full benefits of the guava’s vitamins and minerals.
When choosing the best containers for juicing, look for those made of glass or BPA-free plastic. These materials are non-reactive and won’t alter the taste or quality of the juice. Moreover, they are easy to clean and can be reused multiple times. With an airtight container, you can store your guava juice for up to 3 days in the fridge or up to 6 months in the freezer. Refrigerating or freezing the juice will depend on the amount of time you plan to keep it and your personal preference.
Refrigerate or Freeze
If you want to extend the shelf life of your freshly made guava juice, you should refrigerate or freeze it depending on your preference and how long you plan to keep it. Refrigeration will keep the juice fresh for up to 48 hours, while freezing it can last up to a month. However, freezing may affect the texture and taste of the juice, so it’s recommended to consume it within a week.
There are various ways to use frozen guava, and one of them is to make frozen guava juice. Simply blend the frozen guava with some water and sweetener to taste, and you’ll have a refreshing and healthy drink perfect for hot summer days. Alternatively, you can use frozen guava as a base for smoothies or add it to your favorite cocktail recipes.
Looking for the best guava juice recipes? Keep reading to learn more about the health benefits of guava juice.
Health Benefits of Guava Juice
I love drinking guava juice because it’s not only delicious, but also packed with health benefits.
Guava juice is rich in vitamin C and antioxidants, which are essential for maintaining a healthy immune system and fighting off free radicals in the body.
Additionally, guava juice is great for digestion, as it contains dietary fiber that can help regulate bowel movements and prevent constipation.
Rich in Vitamin C and Antioxidants
You’ll be happy to know that one guava contains four times more vitamin C than an orange, making it an excellent source to boost your immune system and fight off harmful free radicals. Vitamin C is essential for overall health as it helps to stimulate the production of white blood cells that fight off infections and diseases. Consuming foods that are rich in vitamin C, like guava juice, can help prevent illnesses and keep your body functioning properly.
In addition to being a great source of vitamin C, guava juice is also rich in antioxidants. Antioxidants are important because they protect your body from damage caused by free radicals. Free radicals are unstable molecules that can damage your cells and lead to various diseases. By consuming antioxidants, you can help prevent the damage caused by free radicals and maintain good health. So, not only is guava juice delicious, it’s also packed with nutrients that are good for digestion and your immune system.
Good for Digestion and Immune System
Boost your digestive health and strengthen your immune system by incorporating guava into your diet. This tropical fruit is rich in digestive enzymes such as papain and bromelain that help break down food and improve nutrient absorption.
It also contains immune boosters like vitamin C and antioxidants that protect your body against infections and diseases. Guava is particularly good for people with digestive issues such as bloating, constipation, and diarrhea.
Its high fiber content helps regulate bowel movements and prevent constipation, while its anti-inflammatory properties reduce gut inflammation and alleviate symptoms of irritable bowel syndrome. Additionally, the vitamin C in guava stimulates the production of white blood cells, which are responsible for fighting off infections and keeping your immune system strong.
As you can see, guava is a nutritious fruit that offers many benefits for your digestive health and immune system. Now, let’s move on to some tips and tricks for juicing this delicious fruit.
Tips and Tricks
To make your guava juice stand out, sprinkle in a pinch of cinnamon – it’s like adding a cherry on top of your sundae. But that’s not the only way to enhance the flavor of your guava juice.
Here are some tips and tricks to take your guava juice to the next level:
- Add a splash of lime juice for a tangy twist
- Mix in some coconut water for a tropical taste
- Blend in some strawberries for a sweet and fruity blend
- Experiment with different herbs like mint or basil for a unique and refreshing flavor
By using these juicing techniques and guava flavor combinations, you’ll be able to create a delicious and unique guava juice that’s sure to impress. And if you’re feeling adventurous, try adding in some other fruits like pineapple or mango to create even more variations of guava juice. The possibilities are endless!
Variations of Guava Juice
Exploring the many flavors and blends of guava juice can transport your taste buds to a tropical paradise. From sweet and tangy to rich and creamy, guava juice offers a variety of juice flavors that can be used to create unique and delicious cocktail recipes. Here are some variations of guava juice that you can try:
| Juice Flavor | Description | Cocktail Recipe |
|---|---|---|
| Classic | Sweet and tangy with a hint of tropical flavor | Guava Margarita |
| Creamy | Thick and rich with a smooth texture | Guava Colada |
| Spicy | Bold and zesty with a kick of heat | Spicy Guava Martini |
| Citrusy | Light and refreshing with a citrusy twist | Guava Citrus Spritzer |
| Tropical | A blend of various tropical fruits with guava as the star | Tropical Guava Punch |
These juice flavors can be used as a base for a variety of cocktail recipes. For a classic margarita with a tropical twist, try a Guava Margarita by mixing tequila, guava juice, lime juice, and agave nectar. For a creamy and indulgent cocktail, blend guava juice with coconut cream and rum to make a Guava Colada. The options are endless, so experiment with different juice flavors and cocktail recipes to find your perfect guava drink.
Frequently Asked Questions
What are some common mistakes to avoid when juicing guavas?
Oh boy, let me tell you about the common mistakes people make when juicing guavas. First off, using the wrong juicing technique can leave you with a pulpy mess. And for the love of all that is holy, don’t forget to remove the seeds!
Can guava juice be frozen for later use?
Yes, guava juice can be frozen for later use. I recommend pouring the leftover juice into ice cube trays and freezing them. These cubes can then be added to smoothies or thawed for a refreshing drink.
How long does guava juice stay fresh in the fridge?
Funny enough, I just made guava juice yesterday! To keep it fresh in the fridge, I suggest using an airtight container and consuming within 3-4 days. Adding a little lemon juice can also help preserve it.
What are some other recipes that incorporate guava juice?
I love using guava juice in cocktails and smoothies! For a refreshing cocktail, mix guava juice with vodka and lime juice. For a healthy smoothie, blend guava juice with frozen berries and yogurt. Delicious!
Are there any potential side effects of drinking guava juice?
Oh sure, drinking guava juice is all fun and games until you realize there might be some possible risks involved. It’s always good to take precautions and do your research on the health benefits and potential downsides.
Conclusion
Well, that’s it! Now you know how to juice a guava. Remember to gather your ingredients and equipment, wash and cut your guavas, start juicing, and add any additional ingredients if desired. Don’t forget to serve and enjoy your refreshing guava juice, and store any leftovers properly.
Did you know that guava is a superfood? It’s packed with nutrients, vitamins, and minerals that are essential for our health. Guava juice has been shown to improve blood sugar control in people with type 2 diabetes, according to a study published in the Journal of Medicinal Food. So, not only is guava juice tasty, but it can also provide numerous health benefits.
Overall, juicing guavas is a simple and delicious way to incorporate this superfood into your diet. Give it a try and see for yourself!