Connect with us

Juice

How Does Shrimp Cook In Lime Juice

Published

on

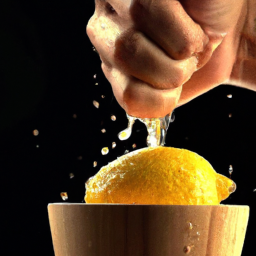
Cooking shrimp with lime juice is like watching an intriguing chemical reaction unfold right in front of you. The lime juice interacts with the proteins in the shrimp, altering their texture and flavor, ultimately creating a mouthwatering dish that is both tangy and rich in taste.

In this article, I will dive deep into the science behind the process, exploring the chemical reactions that occur when shrimp is marinated in lime juice and examining the benefits of this cooking technique. As a food enthusiast, I have always been fascinated by the different ways in which ingredients can be combined to create delicious dishes. However, the idea of cooking shrimp in lime juice was relatively new to me until I tried it myself.

The results were nothing short of spectacular, and I was eager to learn more about the science behind the process. Through my research, I discovered that the acidity in lime juice breaks down the proteins in the shrimp, effectively cooking them without the need for heat. This not only results in a tender and flavorful dish, but also provides several health benefits.

In this article, I will share my findings on the topic, exploring the regional variations, choosing the right shrimp, and safety precautions to take when cooking with lime juice.

Key Takeaways

  • Lime juice breaks down proteins in shrimp, resulting in a similar effect to cooking with heat but without added fat.
  • Regional variations of shrimp cooked in lime juice exist, such as ceviche in Latin America, and lime-marinated shrimp is versatile and pairs well with complementary ingredients.
  • Choosing fresh, sustainably harvested shrimp and properly cleaning and preparing them is crucial for taste and texture.
  • Safety precautions, such as washing hands and using separate cutting boards and utensils for raw seafood, should be taken when handling and preparing shrimp cooked in lime juice.
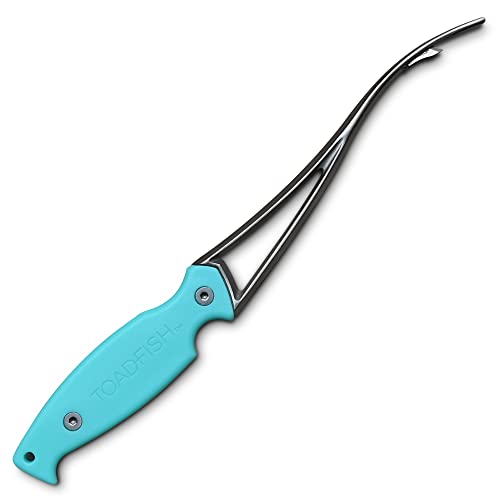
Understanding the Chemical Reaction

You’re gonna love how the lime juice reacts with the shrimp, making it tender and flavorful. There’s actually a scientific explanation for this.

When lime juice comes in contact with shrimp, it triggers a chemical reaction that causes the proteins in the shrimp to break down. This is due to the chemical properties of the lime juice, which is high in citric acid.

Advertisement

The enzymatic breakdown of the proteins in the shrimp results in a change of texture and flavor. The shrimp becomes more tender and easier to chew, while the lime juice imparts a tangy and slightly sweet taste.

This process is commonly known as ‘cooking’the shrimp in lime juice, although technically it’s not the same as applying heat to the shrimp. Instead, the lime juice breaks down the proteins in a way that mimics the effects of cooking.

This is just one of the many benefits of using lime juice as a marinade for shrimp.

Benefits of Lime Juice Marination

I want to talk about the benefits of marinating shrimp in lime juice.

Firstly, there’s no need for heat when marinating with lime juice, making it a simple and easy method for cooking shrimp.

Advertisement

Secondly, the bright and tangy flavor of the lime juice adds a refreshing taste to the shrimp.

Lastly, lime juice pairs well with a variety of other ingredients, making it a versatile ingredient in many different dishes.

No Need for Heat

Surprisingly, shrimp can be transformed into a mouthwatering dish without ever touching a stove or oven when marinated in lime juice. The raw shrimp texture is altered by the acidic marinade, which ‘cooks’ the shrimp by denaturing the proteins.

The shrimp becomes opaque and firm, with a slightly chewy texture that is similar to cooked shrimp. Not only is this method of cooking shrimp incredibly easy, it’s also healthier than traditional cooking methods because it doesn’t require any added oil or fat.

Plus, the bright and tangy flavor of the lime juice complements the natural sweetness of the shrimp, making for a delicious and refreshing dish. So next time you’re craving shrimp, try marinating it in lime juice for a quick, easy, and delicious meal.

Advertisement

Bright and Tangy Flavor

Indulge in the bright and tangy flavors of a lime juice marinade for a shrimp dish that’s both refreshing and delicious.

When shrimp is marinated in lime juice, the acid in the juice gently cooks the shrimp, giving it a unique texture and flavor profile. The tangy lime flavor pairs perfectly with the sweetness of the shrimp, creating a flavor explosion in your mouth.

To make a lime juice marinade, simply combine freshly squeezed lime juice, garlic, salt, and pepper in a bowl. Add the shrimp and let it sit in the marinade for at least 15 minutes.

Once the shrimp has been marinated, it can be cooked in a variety of ways, including grilling or sautéing. This versatile marinade can also be used with other seafood or even chicken for a delicious and healthy meal.

Moving on to the next section, pairing the shrimp with other ingredients can take this dish to the next level.

Advertisement

Pairing with Other Ingredients

Enhance the flavor of your lime-marinated shrimp dish by pairing it with complementary ingredients such as avocado, cilantro, and cherry tomatoes. These flavor combinations will elevate the taste of your dish and give it a unique twist.

Avocado adds creaminess and richness, cilantro brings a fresh and herbaceous flavor, and cherry tomatoes provide a burst of sweetness. These ingredients not only complement the bright and tangy flavor of the lime-marinated shrimp but also create a well-balanced dish that will satisfy your taste buds.

Apart from flavor combinations, cooking techniques also play a crucial role in enhancing the taste of your dish. Grilling or sautéing the shrimp with a little bit of olive oil and seasoning will add depth and complexity to the dish. The caramelization from grilling or sautéing will intensify the flavors and create a mouth-watering experience.

These techniques also make the shrimp tender and juicy, making it the perfect protein for your lime-marinated shrimp dish. With the right pairing of ingredients and cooking techniques, your shrimp dish will be a crowd-pleaser.

As we explore regional variations of this dish, we’ll discover new ways to cook and pair ingredients that will take your lime-marinated shrimp dish to the next level.

Advertisement

Regional Variations

Although there are regional variations, the classic method of cooking shrimp in lime juice is popular throughout Latin America. In Mexico, for example, ceviche is often made with serrano or habanero peppers for a spicy kick. In Peru, the dish is typically served with sweet potato and corn, while in Ecuador, it may include tomato and cilantro.

The cultural significance of ceviche cannot be overstated, as it’s often served as a symbol of national pride and identity.

When cooking shrimp in lime juice, it’s important to choose the right type of shrimp. Look for fresh, high-quality shrimp that have been sustainably harvested. Avoid shrimp that has been previously frozen or treated with preservatives.

Additionally, make sure to remove the shrimp’s digestive tract (the dark vein) before cooking, as it can affect the taste and texture of the dish.

With the right ingredients and technique, cooking shrimp in lime juice can be a delicious and satisfying culinary experience.

Advertisement

Choosing the Right Shrimp

As we’ve seen in the previous subtopic, the way shrimp ceviche is prepared varies greatly depending on the region. However, something that remains constant is the importance of choosing the right shrimp. When it comes to making shrimp ceviche, freshness and quality are key.

To ensure you’re getting the best shrimp for your ceviche, here are a few things to keep in mind:

  • Look for wild-caught shrimp instead of farmed shrimp, as this can help with sustainability concerns.
  • Choose shrimp that are firm and have a slight sheen to them, avoiding any shrimp that smell fishy or have a slimy texture.
  • Consider the size of the shrimp you’re buying, as larger shrimp may take longer to cook.
  • If possible, buy shrimp that are already deveined to save time during preparation.
  • Finally, consider the price – while you don’t necessarily need to buy the most expensive shrimp, you don’t want to skimp either.

Once you have the perfect shrimp for your ceviche, it’s time to move on to the cooking methods.

To prepare shrimp ceviche, there are a few different methods you can use. Some people prefer to simply marinate the shrimp in lime juice until they turn opaque, while others prefer to boil the shrimp briefly before marinating them. Regardless of the method you choose, it’s important to make sure the shrimp are fully cooked before serving.

With the right preparation and cooking, you can create a delicious and refreshing shrimp ceviche that’s sure to be a hit.

Preparing the Shrimp

To get started on preparing your shrimp for ceviche, it’s important to choose fresh, high-quality wild-caught shrimp that are firm and have a slight sheen.

Advertisement

Once you have your shrimp, you’ll need to clean them and remove the shell. To do this, start by holding the shrimp by the tail and gently pulling off the shell. You can also use a paring knife to slit the back of the shrimp and remove the vein. Rinse the shrimp under cold water to remove any remaining debris.

When it comes to choosing the right size of shrimp for ceviche, it’s really a matter of personal preference. Some people prefer small, bite-sized shrimp, while others like the texture and flavor of jumbo shrimp.

Keep in mind that smaller shrimp will cook faster in the lime juice, but larger shrimp will be more substantial in the finished dish.

Once your shrimp are cleaned and ready to go, it’s time to move on to marinating them in lime juice.

Marinating the Shrimp

Now that the shrimp’s prepared, it’s time to marinate them in lime juice. This step is crucial as it infuses the shrimp with tangy flavor while tenderizing the meat.

Advertisement

To marinate the shrimp, I prefer using a large plastic ziplock bag. I add shrimp and enough lime juice to coat all pieces. Then, I seal the bag and leave it in the fridge for at least 30 minutes.

When it comes to grilling the shrimp, there are a few techniques to keep in mind. Firstly, make sure to oil the grill grates to prevent sticking. Secondly, preheat the grill to high heat before adding the shrimp. Finally, grill the shrimp for about 2-3 minutes on each side until they turn pink and slightly charred. If you don’t have access to a grill, you can also cook the shrimp in a hot skillet with some oil.

For those who may not enjoy the taste of lime or want to try something new, there are alternative citrus options. Lemon and orange juice can also be used to marinate the shrimp, providing a slightly different flavor profile. Additionally, adding some chopped garlic or cilantro to the marinade can add a delicious twist to the dish.

As the shrimp finishes cooking, it’s time to start thinking about serving suggestions.

Serving Suggestions

If you’re looking to add a pop of color to your plate, consider garnishing your grilled shrimp with a sprinkle of chopped fresh herbs, like confetti on a party dress. Not only does it add visual interest, but it also enhances the flavor of the dish.

Advertisement

Here are some flavor combinations and presentation ideas to take your shrimp to the next level:

  • Flavor combinations:

  • Lemon and dill

  • Lime and cilantro

  • Garlic and parsley

  • Presentation ideas:

  • Serve on a bed of mixed greens for a salad

  • Skewer with pineapple and bell pepper for a tropical twist

  • Arrange on a platter with sliced avocado and cherry tomatoes for a colorful appetizer

By incorporating these ideas, you can elevate your shrimp dish and impress your guests.

Now, let’s move on to the important topic of safety precautions.

Safety Precautions

Before you start cooking shrimp in lime juice, it’s essential to take note of some safety precautions to ensure that you don’t encounter any unwanted accidents.

Firstly, when handling raw shrimp, it’s crucial to wash your hands thoroughly with soap and water. This step is especially important as raw shrimp may contain bacteria that can cause food poisoning.

Advertisement

Additionally, it’s recommended to use separate cutting boards and utensils for raw seafood and other food items to prevent cross-contamination.

When it comes to storing shrimp, it’s best to keep them refrigerated until ready to use. Raw shrimp can be stored in the refrigerator for up to two days, while cooked shrimp can last for up to four days.

It’s also essential to keep shrimp at a temperature of 40°F or below to prevent the growth of harmful bacteria. If you plan on freezing shrimp, make sure to place them in an airtight container and label it with the date of freezing.

Frozen shrimp can last for up to six months in the freezer. By following these handling tips and storage guidelines, you can ensure that your shrimp dish is not only delicious but also safe to eat.

Frequently Asked Questions

Can I use lemon juice instead of lime juice to cook shrimp?

I wouldn’t recommend using lemon juice instead of lime juice to cook shrimp. Lime juice offers many benefits, such as a higher acidity level and unique flavor profile, which enhances the taste and texture of the shrimp.

Advertisement

How long should I marinate the shrimp in lime juice?

I marinate shrimp in lime juice for 30 minutes before cooking. Longer marinating times will increase flavor intensity but may result in a tougher texture. It’s important to not over-marinate.

Can I use frozen shrimp for this recipe?

Frozen shrimp can be used for this recipe, but it’s important to thaw them properly first. The cooking time may be slightly longer than with fresh shrimp, and the texture may be slightly different, but still delicious.

What other dishes can I make with lime-marinated shrimp?

I love making Grilled Shrimp Skewers and Shrimp Ceviche with lime-marinated shrimp. The tangy citrus flavor pairs perfectly with the shrimp’s sweetness. Both dishes are easy to prepare and perfect for summer gatherings.

How do I know when the shrimp is fully cooked?

To know when shrimp is fully cooked, I look for a change in texture from translucent to opaque and a slight curling. I prevent overcooking by timing it carefully and removing it from heat immediately.

Conclusion

In conclusion, I’ve discovered that cooking shrimp in lime juice isn’t just a delicious way to prepare this seafood favorite. It also has a fascinating chemical reaction that transforms the texture and flavor.

Advertisement

By marinating the shrimp in lime juice, the citric acid breaks down the proteins. This causes the shrimp to become opaque and firm, with a tangy, citrusy taste.

Furthermore, the benefits of lime juice marination aren’t limited to taste alone. Lime juice is also a rich source of vitamin C. This has antioxidant properties that can boost the immune system and protect against disease.

Whether you prefer your shrimp cooked in lime juice with a Caribbean or Latin American twist, or simply enjoy the zesty, refreshing taste, this dish is sure to be a hit at any seafood feast.

So next time you’re in the mood for some delicious shrimp, remember to reach for the lime juice and let the magic happen!

Advertisement

Continue Reading
Advertisement

Juice

How To Freeze Orange Juice

Published

on

By

In my kitchen, surrounded by piles of juicy oranges, I feel a surge of excitement. I know that with a little effort, I can savor this delicious fruit for months to come.

Freezing orange juice is a simple and effective way to ensure that you always have access to this nutritious and refreshing beverage. Imagine a hot summer day, the sun beating down on you mercilessly. All you can think about is a cool glass of orange juice, filled to the brim with ice cubes. With frozen orange juice on hand, you can satisfy that craving any time you want.

In this article, I will guide you through the process of freezing orange juice, from gathering your materials to thawing and using the juice. So, let’s get started!

Key Takeaways

  • Wash oranges before juicing and remove any seeds and large chunks of pulp
  • Use airtight containers or freezer-safe plastic bags for freezing orange juice and label and date them for freshness
  • Thaw frozen orange juice in the refrigerator overnight for slow and even thawing
  • Frozen orange juice can be used as is or in recipes, and pre-portioning juice into smaller containers reduces waste and allows for quicker thawing

Gather Your Materials

Now, you’ll wanna gather all your materials before you start freezing that delicious orange juice.

First, you’ll need to choose the right containers for freezing. I recommend using airtight containers or freezer-safe plastic bags to prevent air and moisture from getting in and affecting the quality of the juice. Make sure to choose containers that are the appropriate size for your needs, whether you want to freeze individual servings or larger batches.

Next, it’s important to properly wash your oranges before juicing them. The best way to wash oranges is to rinse them under cool running water and use a vegetable brush to scrub the surface gently. This will help remove any dirt or debris that may be on the skin.

Advertisement

Once your oranges are clean, you can start juicing them.

Wash and Juice the Oranges

Once you’ve gathered your fresh oranges, it’s time to give them a thorough wash before extracting their delicious nectar. Juicing techniques vary depending on the type of juicer you have, but the most important thing to remember is to remove any seeds and large chunks of pulp before juicing. Here are some tips to help you get the most out of your oranges:

  • Wash the oranges under running water to remove any dirt or debris.
  • Use a citrus juicer or a blender to extract the juice from the oranges.
  • Cut the oranges in half and squeeze them by hand if you don’t have a juicer or blender.
  • Use a strainer to remove any seeds and large pieces of pulp.
  • Experiment with different orange varieties to find your favorite flavor.

Now that you have fresh orange juice, it’s time to prepare it for freezing.

Prepare the Orange Juice for Freezing

To get your orange juice ready for the freezer, start by pouring it into airtight containers or resealable bags. This will help prevent freezer burn and keep your juice fresh for longer.

When selecting oranges for juicing, choose ripe ones that are heavy for their size and have smooth, firm skin. Avoid oranges with soft spots or blemishes, as they may be past their prime.

To juice the oranges, cut them in half and use a citrus juicer or hand-held juicer to extract the juice. You can also use a blender or food processor to blend the oranges and strain the juice through a fine-mesh sieve.

Advertisement

If you want to freeze small portions of juice, consider using a standard ice cube tray, which can hold up to 1/4 cup of liquid.

Once you have prepared your orange juice for freezing, be sure to label and date the containers to keep track of when they were frozen. This will help ensure that you use up the juice before it starts to lose flavor or quality.

Label and Date the Containers

Labeling and dating your containers is a crucial step in preparing your orange juice for freezing. This simple task can help you keep track of your frozen juices and ensure their freshness.

When labeling your containers, make sure to include the date of preparation and the type of juice. This will help you keep track of how long the juice has been frozen and prevent any confusion when you’re looking for a specific flavor.

It’s also essential to use proper containers for freezing juices. Glass containers are an excellent choice because they’re non-reactive and won’t absorb any flavors or odors. Plastic containers are also okay, but make sure they’re BPA-free and can withstand freezing temperatures.

Advertisement

Additionally, consider organizing your frozen juices by flavor or date to make it easier to find what you’re looking for. These tips for labeling, storing, and organizing frozen juices can help you save time and reduce waste.

Now that your containers are labeled and ready to go, it’s time to place them in the freezer.

Place the Containers in the Freezer

Now that you’re ready to freeze your freshly prepared orange juice, all that’s left to do is pop the containers into the freezer and let them chill until you’re ready to enjoy a refreshing glass. But before you do that, here are a few things to keep in mind:

  1. Freezing process: The freezing process can take anywhere from 6-12 hours depending on the temperature of your freezer. It’s important to note that the longer you leave the juice in the freezer, the more likely it is to lose its flavor and nutritional value. So, be sure to check on your juice frequently and remove it from the freezer as soon as it’s fully frozen.

  2. Container options: When it comes to freezing orange juice, you have a few options for containers. You can use plastic containers, glass jars, or even ice cube trays. Plastic containers are the most popular choice as they’re lightweight, easy to stack, and come in a variety of sizes. Glass jars are a good option if you want to avoid plastic or if you plan on storing the juice for a longer period of time. Ice cube trays are great for portion control and can be easily popped into a glass when you’re ready to drink.

  3. Leave room for expansion: No matter which container you choose, be sure to leave some room for the juice to expand as it freezes. If you fill the container up to the brim, the juice may expand and crack or break the container.

  4. Label and date: Before placing the containers in the freezer, don’t forget to label them with the date and contents. This’ll help you keep track of how long the juice has been frozen and ensure that you’re consuming it before its quality deteriorates.

With your containers labeled and filled with freshly squeezed orange juice, you’re ready to freeze them and enjoy a refreshing glass any time you want. But what if you want to enjoy the juice right away? In the next section, we’ll discuss how to thaw frozen orange juice quickly and safely.

Thawing Frozen Orange Juice

Now that we’ve learned how to freeze orange juice, let’s discuss how to thaw it.

Advertisement

There are two main methods to thaw frozen orange juice: in the refrigerator and on the counter. Thawing in the refrigerator is the recommended method as it allows for a slow and even thaw, maintaining the quality and flavor of the juice. However, if you’re short on time, thawing on the counter is also an option.

Thawing in the Refrigerator

First, you’ll want to take your frozen orange juice out of the freezer and place it in the refrigerator to thaw slowly. By doing this, you’ll preserve the flavor and texture of the juice, making it taste just as delicious as the day you froze it. Thawing in the refrigerator is the safest and most effective method for defrosting frozen orange juice. Not only does it ensure that the juice maintains its quality, but it also reduces the risk of harmful bacteria growth.

To ensure that the thawing process goes smoothly, it’s important to store your orange juice in the refrigerator before freezing. This is known as refrigerator storage and it involves keeping the juice at a temperature of 40°F or lower. Additionally, pre-portioning the juice into smaller containers before freezing has numerous benefits. It makes it easier to thaw only the amount of juice needed, reduces waste, and allows for quicker thawing times. By following these simple steps, you’ll be able to enjoy perfectly thawed orange juice every time. In the next section, we’ll discuss another method of thawing frozen orange juice – thawing on the counter.

Thawing on the Counter

For a quicker thawing method, you can try leaving your frozen orange juice on the counter, but be warned that this method comes with some risks. Room temperature thawing can lead to bacterial growth, which can cause foodborne illnesses. However, if you follow some basic guidelines, this method can work well.

Here are the benefits of freezing orange juice and the steps to safely thaw it on the counter:

Advertisement
  1. Freezing orange juice allows you to enjoy the taste and nutritional benefits of fresh juice for months.

  2. To thaw orange juice on the counter, remove it from the freezer and place it on a plate or in a bowl to catch any drips.

  3. Leave it at room temperature for 2-3 hours, or until completely thawed.

  4. Once thawed, stir the juice well and refrigerate it until ready to use.

To use frozen orange juice, you can either drink it as is or use it in recipes that call for fresh juice. Now that your orange juice is thawed and ready to use, let’s explore some delicious ways to incorporate it into your cooking.

Using Frozen Orange Juice

To enjoy your frozen orange juice, simply thaw it in the fridge overnight and give it a good shake before pouring yourself a refreshing glass!

Once thawed, you can use your frozen orange juice in various recipes that call for fresh orange juice. The benefit of using frozen orange juice is that it lasts longer than fresh juice and can be used whenever you need it.

Using frozen orange juice in recipes is a great way to add a burst of citrus flavor to your dishes. You can use it in marinades, dressings, smoothies, or even bake with it. The possibilities are endless!

But if you prefer a more concentrated orange flavor, you may want to try freezing orange juice concentrate instead.

Advertisement

Freezing Orange Juice Concentrate

You won’t believe how easy it is to transform a small can of orange juice concentrate into a powerhouse of flavor for your recipes! Freezing orange juice concentrate is a simple process that can help you save time and money while adding a burst of citrusy goodness to your dishes.

To freeze orange juice concentrate, all you need to do is pour the contents of the can into a freezer-safe container and place it in the freezer. With this simple step, you can have a delicious ingredient on hand whenever you need it.

Orange juice concentrate is not only convenient, but it also offers a range of nutritional benefits. It’s a great source of vitamin C and other antioxidants that can help boost your immune system. Plus, it’s low in calories and fat, making it a healthier alternative to other sweeteners in your recipes.

With a little creativity, you can use frozen orange juice concentrate to make everything from salad dressings to marinades and desserts. Looking for other citrus fruits to freeze? Try freezing lemon or lime juice. Just like orange juice concentrate, they can add a zesty flavor to your recipes without the hassle of squeezing fresh citrus.

With these frozen juices on hand, you can easily add a delicious twist to your dishes and enjoy the nutritional benefits of these citrus fruits.

Advertisement

Other Citrus Fruits to Freeze

Transforming your recipes with the zesty flavors of frozen lemon or lime juice is a simple and delicious way to add a burst of citrus to your dishes. Freezing lemon juice is an excellent way to preserve the tangy flavor of this fruit for later use.

To freeze lemon juice, simply squeeze fresh lemons and pour the juice into an ice cube tray. Once the juice is frozen, pop out the cubes and store them in a freezer-safe container for up to six months. Frozen lemon juice cubes are perfect for adding flavor to marinades, cocktails, and desserts.

Grapefruit juice is another citrus fruit that can be easily preserved by freezing. Preserving grapefruit juice is an excellent way to enjoy the tart and tangy flavor of this fruit year-round.

To freeze grapefruit juice, simply squeeze fresh grapefruit and pour the juice into an ice cube tray. Once the juice is frozen, pop out the cubes and store them in a freezer-safe container for up to six months. Frozen grapefruit juice cubes can be used to add flavor to smoothies, cocktails, and other recipes that call for grapefruit juice.

Frequently Asked Questions

Can I use frozen oranges instead of fresh ones to make orange juice for freezing?

I tried using frozen oranges for orange juice and found it to be just as delicious and nutritious as using fresh ones. Freezing preserves the nutritional benefits and the juice can be stored for longer periods of time.

Advertisement

How long can I keep frozen orange juice in the freezer before it goes bad?

Frozen orange juice can last up to 12 months in the freezer if stored properly. Best storage practices include using airtight containers or freezer bags, removing excess air, and labeling with the date. Different freezing methods may affect shelf life.

Can I add sugar or other sweeteners to the orange juice before freezing it?

Yes, sweeteners can be added to orange juice before freezing it. However, it’s recommended to add them after thawing to ensure proper blending. Use airtight containers, leaving some space for expansion, for the best results.

Can I freeze freshly squeezed orange juice that contains pulp?

Did you know that freezing pulp containing orange juice can alter its texture? To avoid this, strain the juice before freezing. Store the frozen orange juice in airtight containers and use within 2-3 months. Tips and tricks for freezing pulp containing juice. Best practices for storing frozen orange juice.

Can I use plastic bags instead of containers to freeze the orange juice?

Yes, plastic bag alternatives can be used to freeze orange juice. However, the freezing time may be longer compared to using containers. It is important to ensure the bags are sealed tightly to prevent freezer burn.

Conclusion

Well, it turns out that freezing orange juice isn’t rocket science. It’s a simple process that anyone can do with the right materials and a few easy steps.

Advertisement

And yet, despite its simplicity, freezing orange juice can be a game-changer for those who love the taste of fresh-squeezed orange juice but don’t have the time to make it every morning.

But let’s be real here. Who wants to freeze orange juice when you can just buy it at the store? I mean, why go through all the trouble of washing and juicing oranges, preparing the juice for freezing, and labeling and dating containers, when you can just grab a carton of orange juice off the shelf?

It’s ironic, really. We live in a world where convenience is king, yet we’re still willing to go the extra mile for something as simple as orange juice. But hey, if you’re a true orange juice connoisseur, then freezing your own juice might be worth it.

Continue Reading

Juice

How Much Juice Per Lime

Published

on

By

Being someone who regularly includes lime juice in my cooking and drinks, I understand how important it is to get the right amount of juice from each lime. Consistency and quality are crucial, especially when following recipes that require precise measurements.

That’s why I’ve done my research on how much juice per lime you can expect and the factors that can affect it. When it comes to measuring lime juice, it’s not as simple as just squeezing a lime and hoping for the best. There are many variables that can influence how much juice you get from each lime, including the type of lime, its ripeness, and the tools you use to extract the juice.

As someone who wants to ensure the best results in my cooking and drinks, I’ve delved into these factors and have some insights to share. So, if you’re like me and want to maximize your lime juice yield, stay tuned for some useful tips and techniques.

Key Takeaways

  • The amount of juice per lime depends on factors such as ripeness, pressure applied and tools used, with an average yield of 0.5-2.5 oz.
  • Best practices for juicing limes include using room temperature limes, a citrus juicer, and consistent technique, while ripe limes should be heavy with fragrant citrus scent.
  • Tips for maximizing juice yield include choosing the right lime, using a citrus reamer/juicer, rolling on a hard surface, microwaving, cutting in half lengthwise, and using a fine mesh strainer.
  • Lime juice is not only a flavorful addition to cooking, baking and cocktail-making, but also offers health benefits such as vitamin C, antioxidants and aiding digestion, and can be stored through refrigeration, freezing or canning.

Factors Affecting the Amount of Juice per Lime

When you squeeze a lime, the amount of juice you get can be affected by various factors. The ripeness of the lime plays a significant role in determining the amount of juice yield. If the lime is too ripe, it may have less juice content, and if it’s not ripe enough, it may not have reached its full potential.

Another factor that affects the juice yield is the amount of pressure you apply. If you squeeze the lime too hard, you may extract some bitter compounds from the lime peel, which can affect the flavor of the juice.

To ensure that you get the best juice yield from your limes, it’s essential to follow some best practices for lime juicing. First, make sure that the limes are at room temperature before juicing. This helps to soften the lime, making it easier to extract the juice.

Advertisement

Second, use a citrus juicer to extract the juice from the lime. This ensures that you get the most juice yield without any bitter compounds from the peel.

Finally, be consistent in your juicing technique to ensure that you get the same amount of juice yield from each lime. By following these best practices, you can ensure that you get the most out of your limes and use them to their full potential.

Now, let’s move on to the next section about the different types of limes.

Types of Limes

I want to talk about the different types of limes that affect the amount of juice per lime. Specifically, we’ll be discussing Key Limes, Persian Limes, and Bearss Limes.

It’s crucial to understand the differences between these types of limes in order to achieve consistency and quality control when measuring the amount of juice per lime.

Advertisement

Key Limes

You’ll be surprised at how much tangy juice those tiny key limes can yield! As a citrus fruit with a high acidity content, key limes are commonly used in cooking, baking, and cocktail-making. When it comes to lime harvesting techniques, key limes are hand-picked when they are still green and unripe. This is because key limes will continue to ripen and turn yellow even after they are harvested.

To paint a clearer picture, let’s take a look at this table comparing the juice yield of key limes versus the more common persian limes:

Lime Type Juice Yield (in ounces) per Lime
Key Lime 0.5 – 1.5
Persian Lime 1.5 – 2.5

As you can see, key limes may be smaller in size, but they can pack a powerful punch in terms of tangy flavor. This is why it’s important to be consistent with the amount of juice extracted from each lime, especially when it comes to recipe measurements. Speaking of persian limes, let’s now move on to discussing the differences between key limes and persian limes in terms of taste and usage.

Persian Limes

Did you know that the larger and less acidic persian limes are often used in dishes and drinks that require a milder citrus flavor? As a lime farmer, I can attest to the fact that Persian lime cultivation is a delicate process that requires attention to detail and constant quality control.

These limes are typically grown in tropical and subtropical regions and need consistent irrigation, fertilization, and pest control in order to produce high-quality fruit.

Advertisement

In addition to being a staple ingredient in many cuisines, Persian limes also have numerous health benefits. They’re rich in vitamin C, antioxidants, and flavonoids, which can help boost the immune system and reduce the risk of chronic diseases.

With all these benefits, it’s no wonder why Persian limes are in high demand in the culinary and health industries. Speaking of demand, let’s move on to the next section about the popular Bearss limes.

Bearss Limes

Bearss limes, also known as Tahitian limes, are often mistaken for lemons due to their pale yellow-green color, but their juicy and acidic flesh sets them apart. As with any lime, it’s important to use the correct amount of juice to ensure consistency in flavor and quality.

Here are three things to keep in mind when juicing Bearss limes:

  1. Bearss lime seasonality: These limes are typically available from May to September, with peak season in July and August. It’s important to use the freshest limes possible to get the best flavor and juiciness.

  2. Bearss lime flavor profile: These limes have a less acidic flavor compared to other lime varieties, with a slightly sweet and floral taste. This makes them a great choice for cocktails and desserts.

  3. Precise and accurate measurements: To ensure consistency in your recipes, it’s important to measure the amount of juice you extract from each lime. A good rule of thumb is to get about 1-2 tablespoons of juice per Bearss lime.

When juicing Bearss limes, it’s important to use the right tools to get the most juice out of each lime. Let’s take a look at some of the best tools for juicing limes.

Advertisement

Tools for Juicing Limes

To efficiently extract the most juice from your limes, you’re gonna need some proper tools. There are various juicing tools that you can use to extract lime juice, and each of them has its unique advantages and disadvantages. Some of the most common juicer types include manual and electric juicers, citrus reamers, and hand squeezers. The type of juicer you choose will depend on your personal preference, the amount of lime juice you need, and the consistency of the juice you want to achieve.

To give you a better idea of the different juicing tools available, here’s a table that outlines some of their features and benefits:

Juicer Type Features Benefits
Manual Juicer Handheld, easy to use Perfect for small amounts of juice
Electric Juicer Automatic, fast, and efficient Best for large batches of juice
Citrus Reamer Simple design, affordable Ideal for squeezing small amounts of juice
Hand Squeezer Easy to use, compact Great for making a quick drink or two

When it comes to extracting lime juice, consistency is key. To ensure that you get the best results, it’s important to use the right juicing tool for the job. Once you’ve extracted the juice, the next step is to choose ripe limes to get the most flavor and nutrients from your juice.

How to Choose Ripe Limes

Choosing ripe limes is like finding the perfect avocado – you want to squeeze them gently and feel for a slight give, indicating they’re ripe and ready to use. Here are a few tips for selecting the best limes:

  1. Look for limes that are heavy for their size. This means they contain more juice and are likely ripe.
  2. Check the color of the lime’s skin. A ripe lime will be bright green or yellowish-green. Avoid limes that are too green or too yellow.
  3. Smell the lime. A ripe lime will have a fragrant, citrusy scent.
  4. Avoid limes with soft or mushy spots, as they may be overripe or spoiled.

Knowing how to tell if a lime is ripe is crucial for ensuring the best flavor and consistency in your recipes. Once you have your ripe limes, it’s important to use them efficiently.

One of the best ways to use leftover lime juice is to freeze it in ice cube trays for later use in cocktails or marinades.

Advertisement

Now, let’s move on to the next step – juicing those limes.

How to Juice a Lime

When you’re making a recipe that calls for fresh lime juice, it’s important to know how to properly juice a lime to get the most out of its tangy flavor. While there are alternative methods, I prefer to use a traditional citrus juicer. This tool allows me to extract the maximum amount of juice from each lime with minimal effort.

To ensure consistency and quality control, I like to measure the amount of juice I get from each lime. The easiest way to do this is to use a measuring cup or spoon. According to my experience, on average, one lime produces about 2 tablespoons of juice. However, this can vary depending on the size and ripeness of the lime. Therefore, it’s important to taste and adjust the amount of juice added to a recipe accordingly. Using fresh lime juice has many benefits, including enhancing the flavor of dishes and providing a healthy dose of vitamin C.

How to Measure Lime Juice

Measuring lime juice is like creating a perfect balance in a recipe, where too little can leave a dish lackluster and too much can overpower its flavors. To ensure consistency and quality control, it’s important to measure the amount of lime juice used in a recipe accurately. Here are four steps to measuring lime juice:

  1. Cut the lime in half: Before juicing a lime, cut it in half using a sharp knife or a citrus juicer.

  2. Extract the juice: Squeeze the lime halves using a manual juicer, or use a reamer to extract the juice. You can also use a citrus press to get every last drop of juice from the lime.

  3. Strain the juice: To remove any seeds or pulp, strain the lime juice through a fine mesh strainer or cheesecloth.

  4. Measure the juice: Use a measuring cup or a tablespoon to measure the amount of lime juice needed for the recipe.

Alternative uses for lime juice include adding it to water for a refreshing drink, mixing it with honey as a natural cough remedy, or using it as a natural cleaning agent. Additionally, lime juice has several health benefits, including aiding digestion, boosting the immune system, and fighting against infections. By measuring the amount of lime juice accurately, you can ensure that you’re getting the full benefits of this citrus fruit.

Advertisement

Moving on to the next section, let’s talk about the average amount of juice per lime.

Average Amount of Juice per Lime

You’re in for a citrusy surprise – each lime is a tiny treasure trove of zesty goodness waiting to burst forth with every cut. The average amount of juice per lime can vary depending on the type of lime, its ripeness, and the lime squeezing techniques used.

Generally, a single lime can yield approximately 2 tablespoons of juice, but some limes may contain up to 3 tablespoons or more. To ensure consistency and quality control, it’s important to measure the juice accurately. This can be done using a citrus juicer or by hand-squeezing the lime with a fork or citrus press.

If you’re short on limes or prefer not to use them, there are also lime juice alternatives such as bottled lime juice or concentrated lime juice. However, it’s important to note that the taste and freshness may differ from using fresh limes.

By maximizing juice yield and using the right techniques, you can get the most out of each lime and elevate your dishes to the next level.

Advertisement

Tips for Maximizing Juice Yield

Now that we know the average amount of juice per lime, let’s talk about how to maximize the juice yield from each lime. As someone who uses lime juice frequently in my cooking and cocktails, I’ve found that a few tips and tricks can make a big difference in the amount of juice I’m able to extract from each lime.

First and foremost, it’s important to choose the right type of lime. Mexican limes, also known as key limes, are smaller and juicier than the larger Persian limes commonly found in grocery stores. Additionally, using a citrus reamer or juicer can help to extract as much juice as possible.

Here are a few more tips for maximizing flavor and yield when working with limes:

  • Roll the lime on a hard surface before cutting it to loosen the juice.
  • Microwave the lime for 10-20 seconds before juicing to soften the fruit and make it easier to extract the juice.
  • Cut the lime in half lengthwise, rather than crosswise, to expose more of the juice sacs.
  • Use a fine mesh strainer to remove any seeds or pulp that may have gotten into the juice.

By following these tips, you can ensure that you’re getting the most out of each lime and maximizing the flavor in your recipes. However, if you find yourself without any fresh limes on hand, there are also a number of lime juice substitutes that can work in a pinch. But more on that in the next section.

When it comes to storing lime juice, there are a few important things to keep in mind.

Storing Lime Juice

To keep your lime juice fresh and flavorful, it’s important to know the best ways to store it. Storing lime juice properly can prevent oxidation, which can cause the juice to lose its flavor and nutrients. Here are some tips on how to store lime juice:

Advertisement
Method Description Pros Cons
Refrigeration Store in airtight container and refrigerate. Keeps juice fresh for up to a week. May cause juice to lose some flavor.
Freezing Freeze in ice cube trays or freezer-safe container. Can be stored for up to 6 months. Thawing may cause separation.
Canning Use canning jars and follow proper canning procedures. Can be stored for up to a year. Requires proper equipment and technique.

Consistency and quality control are important when storing lime juice. Be sure to use precise and accurate measurements when storing and labeling, and always use fresh, high-quality limes. With the proper storage methods, you can enjoy fresh and flavorful lime juice for all your recipe needs.

Now that you know how to store your lime juice properly, let’s move on to some delicious recipes that use this versatile ingredient.

Recipes Using Lime Juice

Let’s explore some mouth-watering recipes that incorporate the zesty flavor of lime juice, adding a burst of freshness to any dish. Lime juice is not only a delicious addition to meals, but it also offers a range of health benefits. It’s packed with Vitamin C, which helps boost immunity and improve skin health. Additionally, it can aid in digestion and has anti-inflammatory properties.

If you’re looking for a substitute for lime juice, lemon juice is a great option. However, keep in mind that the flavors are slightly different, so it may alter the taste of the dish.

Now, onto some delicious recipes that use lime juice:

Advertisement
  • Lime and cilantro rice: Cook white rice with lime juice, chopped cilantro, and a bit of salt for a flavorful and easy side dish.

  • Lime marinated shrimp tacos: Marinate shrimp in lime juice, garlic, and chili powder before cooking and serving in a tortilla with your favorite toppings.

  • Lime and avocado salsa: Mix diced avocado, tomatoes, red onion, and lime juice for a fresh and healthy dip.

  • Lime and honey glazed chicken: Brush chicken with a mixture of lime juice, honey, garlic, and soy sauce before baking for a tasty and tangy main dish.

Remember, when using lime juice in your recipes, it’s important to be precise with measurements to ensure consistency and quality control. So, grab your lime and get cooking!

Frequently Asked Questions

How many calories are in lime juice?

Lime juice nutrition varies depending on preparation. For accurate calorie count, measure ingredients precisely. Lime juice recipes benefit from consistency and quality control. Technical language ensures accurate measurements and consistent results.

Can lime juice be used as a substitute for lemon juice in recipes?

As a bartender, I prefer lime juice over lemon for cocktails. In baking, use half the amount of lime juice in place of lemon and adjust to taste. Consistency and quality control are vital for optimal results.

What are some health benefits of consuming lime juice?

As someone who loves the immune boosting and skincare benefits of lime juice, I also appreciate its versatile culinary uses and unique flavor profiles. Consistency and quality control are key to unlocking its full potential.

How long does lime juice last in the refrigerator?

Funny you should ask, I just stored some lime juice in the fridge myself. Typically, lime juice lasts about 2-3 weeks when refrigerated properly. Make sure to check the expiration date and practice quality control.

Advertisement

Are there any alternative methods for juicing limes other than using a citrus juicer?

I’ve found that manual juicing techniques work well for limes. A sturdy handheld citrus squeezer or even a fork can do the trick. It’s important to consistently measure and control quality to ensure the best results.

Conclusion

In conclusion, juicing limes can be a daunting task, but with the right tools and techniques, it can be a breeze. Always choose the right type of lime for your recipe, and make sure it’s ripe before juicing.

Using the right juicing tools, such as a citrus reamer or juicer, can make a big difference in the amount of juice you yield. Consistency and quality control are key when it comes to measuring the amount of juice per lime. It’s important to know the average amount of juice per lime, and to maximize juice yield by using tips such as warming the lime, rolling it before juicing, and applying pressure evenly.

Storing lime juice properly can also help maintain its freshness and flavor. Remember, the right amount of lime juice can make or break a recipe, so take your time and ensure that you’re getting the most out of your limes.

With these tips in mind, you can be sure to impress your guests with delicious lime-infused dishes. So go ahead, juice those limes with confidence, and enjoy the zesty flavors they bring to your dishes!

Advertisement

Continue Reading

Juice

How To Get Cranberry Juice Out Of Clothing

Published

on

By

Have you ever experienced the frustration of spilling cranberry juice on your favorite shirt or dress by accident? It may seem like a daunting challenge to get rid of that stubborn stain, but don’t lose hope!

I have some tips and tricks that can help you remove cranberry juice stains from clothing. Acting quickly is key when it comes to removing any type of stain, including cranberry juice. The longer the stain sits, the harder it will be to remove.

In this article, I will share various methods that you can try at home to get that stubborn cranberry juice stain out of your clothes. So, roll up your sleeves and let’s get to work!

Key Takeaways

  • Acting quickly is important for successful stain removal
  • Blotting techniques should be used to avoid spreading the stain
  • Different cleaning solutions work best for different fabric types
  • Preventive measures can be taken to avoid stains in the first place

Act Fast and Blot the Stain

You gotta act fast and blot that cranberry juice stain before it sets in! Blotting techniques are crucial when it comes to removing cranberry juice stains from clothing. The longer the stain sits, the harder it becomes to remove it completely.

To start, grab a clean cloth or paper towel and gently blot the stain, making sure not to rub it in further. Blotting helps to absorb as much of the juice as possible, preventing it from seeping deeper into the fabric. Remember to blot from the outside of the stain towards the center to avoid spreading it.

The importance of quick response cannot be overstated – the sooner you begin to blot, the better your chances of removing the stain completely.

Advertisement

Now, to move on to the next step, try cold water and dish soap.

Try Cold Water and Dish Soap

Using a mixture of cold water and dish soap can be surprisingly effective in removing stubborn stains from your favorite clothes. This alternative method is perfect for removing cranberry juice stains, especially if you act quickly.

First, run cold water over the affected area to flush out as much of the stain as possible. Then, apply dish soap directly onto the stain and let it sit for a few minutes. Rub the fabric together gently, making sure the soap gets deep into the fibers.

Rinse the clothing thoroughly with cold water, and repeat the process until the stain disappears. While this method is usually effective, there are potential drawbacks to using it.

For one, dish soap can sometimes cause discoloration or damage to certain fabrics. It’s also important to note that this method might not work on more severe cranberry juice stains. In these cases, you might need to try a different approach.

Advertisement

But before moving on to another method, it’s always worth giving this one a shot. If it doesn’t work, you can move on to the next step: using white vinegar and baking soda.

Use White Vinegar and Baking Soda

Did you know that white vinegar and baking soda can be a powerful combination for removing tough stains from fabric, with over 80% success rate reported by users?

Here are four steps to follow when using these household items to get cranberry juice out of clothing:

  1. Blot the stain with a clean cloth to remove as much cranberry juice as possible.
  2. Mix equal parts white vinegar and water in a spray bottle.
  3. Spray the mixture onto the stain and let it sit for 5-10 minutes.
  4. Sprinkle baking soda over the area and gently scrub with a soft-bristled brush, then rinse with cold water.

Prevention techniques are always the best approach, but in case of an accident, using white vinegar and baking soda can be a highly effective solution for removing cranberry juice from clothing. Other household items, such as salt or lemon juice, can also work well in removing cranberry juice stains. By acting quickly and following these steps, you can save your favorite shirt or dress from being ruined.

To continue removing the stain, the next step is to apply hydrogen peroxide and dish detergent.

Apply Hydrogen Peroxide and Dish Detergent

Now it’s time to tackle that stubborn cranberry juice stain with a powerful combination of hydrogen peroxide and dish detergent. First, apply hydrogen peroxide to the affected area and let it sit for a few minutes. This will help break down the stain and make it easier to remove. Be sure to test the fabric first to ensure that the hydrogen peroxide won’t cause any discoloration or damage.

Advertisement

If you don’t have hydrogen peroxide on hand, there are alternatives you can use such as lemon juice or vinegar. Just be aware that these may not be as effective as hydrogen peroxide.

Once the hydrogen peroxide has had time to work its magic, apply a small amount of dish detergent to the stain and rub gently. This will help lift the stain out of the fabric. Rinse the area with cold water and repeat the process if necessary until the stain is completely gone.

To continue removing the cranberry juice stain, try applying lemon juice and salt to the affected area. This will help further break down and lift the stain out of the fabric.

Apply Lemon Juice and Salt

For a natural approach to removing stains, try a mixture of lemon juice and salt. Benefits of lemon juice include its natural bleaching effect, which can help brighten whites and remove stains. When combined with salt, a natural abrasive, this mixture can effectively break down and lift stains from clothing.

To use this method, simply mix equal parts lemon juice and salt to create a paste. Apply the paste directly to the stained area and let it sit for about 30 minutes. Then, gently rub the paste into the stain and rinse with cold water.

Advertisement

This alternative use for salt not only helps break down the stain, but also helps to exfoliate any dirt or buildup on the fabric. For tougher stains or set-in stains, you may need to try commercial stain removers. But for a natural and effective solution, this lemon juice and salt mixture can be a great go-to.

Try Commercial Stain Removers

Using commercial stain removers can be a practical solution for tough or set-in stains on your clothes. When it comes to cranberry juice stains, there are a variety of options available on the market. Look for products that specifically target fruit stains or have enzymes to break down the stain.

If you prefer a more natural approach, consider using vinegar and baking soda. Mix equal parts of white vinegar and water and apply it to the stained area. Let it sit for a few minutes before sprinkling baking soda on top. Gently scrub the mixture into the stain with a brush before washing the garment as usual.

Another option is to try natural stain removers like lemon juice or hydrogen peroxide. Apply to the stain and let sit for 5-10 minutes before washing.

For tougher stains, enzyme-based cleaners can be a great option.

Advertisement

Use Enzyme-based Cleaners

Enzyme-based cleaners break down stubborn stains by targeting the proteins and organic materials that have penetrated the fabric fibers, leaving your clothes cleaner and fresher than ever before. These cleaners are a great option for removing cranberry juice stains because they contain enzymes that can break down the pigments in the stain.

Here are some benefits of using enzyme cleaners and tips for choosing the right one:

  • They’re effective in breaking down tough stains.
  • They’re safe for most fabrics and colors.
  • They’re environmentally friendly.

When choosing the right enzyme cleaner, look for a cleaner specifically designed for the type of fabric you’re treating. Check the label for the types of stains the cleaner is effective against. Always test the cleaner on a small, inconspicuous area of the garment before using it on the stain.

Consider professional dry cleaning if the stain persists after using an enzyme cleaner.

Consider Professional Dry Cleaning

If you’re at your wit’s end with that stubborn cranberry juice stain, it might be time to consider professional dry cleaning. While enzyme-based cleaners can work wonders, some stains are too tough to handle on your own.

Professional dry cleaners use specialized techniques and chemicals that can remove even the most stubborn of stains. However, it’s important to consider the cost of professional dry cleaning, as it can be significantly higher than other cleaning methods.

Advertisement

If the cost of professional dry cleaning is too steep for your budget, there are alternative methods you can try. One option is to use a combination of vinegar and baking soda to create a paste that can be applied directly to the stain. Another option is to use a mixture of hydrogen peroxide and dish soap, which can be rubbed onto the stain before washing the clothing as usual. These methods may take more time and effort, but they can still be effective in removing tough stains.

Looking for ways to prevent future stains? Try using a stain-resistant fabric spray or treating your clothing with a water and stain repellent before wearing. By taking proactive measures, you can avoid the headache of dealing with stubborn stains in the future.

Tips for Preventing Future Stains

To keep your favorite outfits looking pristine, you’ll want to take note of a few tips for preventing future stains.

One of the most effective preventive measures is to avoid wearing light-colored clothes when consuming cranberry juice. If you must wear light-colored clothing, be sure to use a napkin or towel to wipe your mouth after every sip. Additionally, you can opt to wear a bib or apron to protect your clothes from accidental spills.

Another preventive measure is to immediately treat any spills or stains as soon as they occur. Always have a stain remover on hand and use it immediately to prevent the stain from setting. If you’re unable to remove the stain with a stain remover, consider alternative cleaning methods such as using vinegar or lemon juice.

Advertisement

By taking these preventive measures, you can avoid the hassle of having to remove cranberry juice stains from your clothing in the future. With these tips in mind, you can now confidently enjoy your favorite cranberry juice without worrying about ruining your clothes.

In the next section, we will discuss some final thoughts on how to maintain the quality of your clothing despite accidental spills and stains.

Final Thoughts

Now that you know how to prevent future stains, don’t forget to always have a stain remover on hand and immediately treat any spills to maintain the quality of your clothing. It’s important to take preventive measures and be proactive in avoiding stains, especially when it comes to cranberry juice, which can be particularly stubborn. But even with the best prevention methods, accidents can happen. That’s why it’s crucial to act quickly and efficiently to remove the stain before it sets in.

The importance of quick action cannot be overstated when it comes to removing cranberry juice stains. As soon as you notice a spill, blot the area with a clean cloth or paper towel to remove as much of the liquid as possible. Then, refer to the table below for specific steps to take depending on the type of fabric you’re dealing with. By following these steps and taking immediate action, you can increase your chances of successfully removing the stain and salvaging your clothing.

Fabric Type Treatment
Cotton Rinse with cold water, pre-treat with stain remover, wash in warm water
Wool Blot with cold water, apply mixture of vinegar and water, dry clean
Synthetic Blot with cold water, apply rubbing alcohol, wash in warm water

Remember, prevention is key, but quick action is crucial in removing cranberry juice stains from clothing. By following these tips and utilizing the appropriate treatment for your fabric type, you can keep your clothes looking their best.

Advertisement

Frequently Asked Questions

Can cranberry juice stains be removed from all types of clothing materials?

Removing cranberry juice stains from clothes depends on fabric compatibility and stain prevention. Alternative methods include vinegar and baking soda. As someone who loves cranberry juice, I’ve found these tricks to be effective in keeping my clothes stain-free.

How long does it take for cranberry juice stains to set in and become difficult to remove?

To prevent cranberry juice stains from setting in, it’s important to act fast. Blot the stain with a clean cloth and apply a stain remover. Effective cleaning techniques include using vinegar or hydrogen peroxide.

Is it safe to use hydrogen peroxide on all types of clothing?

Using hydrogen peroxide on clothes has pros and cons. It can effectively remove tough stains but may also cause discoloration or damage delicate fabrics. Alternative stain removing methods for delicate fabrics include using vinegar or enzyme-based cleaners.

What should I do if the cranberry juice stain has already dried?

If a cranberry juice stain has dried, it can be difficult to remove. Preventive measures include blotting the stain immediately and avoiding heat. Alternative cleaning solutions may include vinegar or enzyme-based cleaners.

Are there any home remedies for removing cranberry juice stains that are not mentioned in the article?

I once spilled cranberry juice on my favorite shirt and tried everything to remove the stain. Eventually, I discovered a home remedy using baking soda, vinegar, and dish soap. There are many alternative cleaning solutions to try when removing cranberry juice stains.

Advertisement

Conclusion

Well, there you have it – six different methods for getting cranberry juice out of your clothing.

While some methods may work better than others depending on the type of fabric and severity of the stain, it’s important to act fast and blot the stain as soon as possible.

But what if none of these methods work? Don’t worry, there’s still hope. You can always take your stained clothing to a professional dry cleaner who may have access to stronger cleaning agents and techniques.

However, prevention is always better than cure. So, the next time you’re enjoying a glass of cranberry juice, be sure to take extra precautions to avoid any spills or accidents. Trust me, your clothes will thank you for it!

Advertisement

Continue Reading

Trending

Copyright © 2024 The Graceful Kitchen Affiliate disclaimer As an affiliate, we may earn a commission from qualifying purchases. We get commissions for purchases made through links on this website from Amazon and other third parties.