
I absolutely adore ice pops, especially during the hot summer months. They provide a refreshing treat that quickly chills you out and satisfies your desire for something sugary. However, store-bought ice pops can be expensive and typically contain artificial ingredients and preservatives. That’s why I enjoy making my own ice pops using juice!
It’s a fun and easy way to create your own delicious and healthy treats. To make ice pops with juice, all you need is a few simple supplies and some creativity. You can use any type of juice that you like, whether it’s store-bought or homemade. You can also experiment with different flavors and combinations to create your own unique recipes.
In this article, I’ll guide you through the process of making ice pops with juice step-by-step, from preparing the juice to unmolding the pops. So grab your supplies and let’s get started!
Key Takeaways
- Making ice pops with juice is a fun and healthy alternative to buying store-bought popsicles filled with artificial ingredients and preservatives.
- Customizing your ice pops with different flavors, fresh fruit or herbs, and alternative juices can enhance the taste and presentation of your homemade treat.
- It’s important to choose sturdy cups, popsicle sticks, and molds that are the right size and to freeze them in the back of the freezer to ensure even freezing and prevent ice crystals.
- Making homemade ice pops with juice is a great way to create memories and traditions with loved ones, and can be a regular occurrence in family or friend groups.

Silicone Popsicle Molds 10-cavity, DIY Ice Pop Mold for Kids Adult Teens, BPA Free Ice Cream Molds for Party Yogurt Juice Smoothies Sticks
- Large Capacity: Makes 10 or 12 popsicles at once
- Versatile Flavors: Create ice pops with juice, milk, or yogurt
- Durable Silicone: Withstands -100°F to 425°F temperatures
As an affiliate, we earn on qualifying purchases.
As an affiliate, we earn on qualifying purchases.
Gather Your Supplies
Make sure you’ve got all the necessary supplies, like cups, popsicle sticks, and of course, your favorite juice! To create the perfect ice pops, you’ll need to gather all the supplies on your checklist.
First, choose your cups wisely. You’ll want cups that are sturdy enough to hold the juice without collapsing, but also small enough to fit in your freezer.
Next, grab some popsicle sticks. These will be used to hold the popsicle in place while you enjoy your frozen treat.
Once you have your cups and sticks, it’s time to select your juice. Choose a juice that is not too thick and has a strong flavor, as the freezing process will dull the taste slightly. You can also consider mixing different types of juice to create unique flavor combinations. Keep in mind that if you choose a juice that is too sweet, it may not freeze properly.
With your supplies gathered and juice selected, it’s time to move on to preparing the juice.
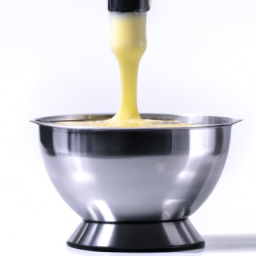
Prepare the Juice
Squeeze the sweet nectar from your favorite fruits and let their flavors dance on your taste buds with every lick. When it comes to making ice pops with juice, the selection of juice is crucial. You want to choose a juice that’s both tasty and healthy.
Some popular choices include orange juice, apple juice, grape juice, and pineapple juice. However, you can experiment with different combinations of fruit juices to create your own unique flavor. Once you’ve selected your juice, it’s time to prepare it.
To make the juice more flavorful, you can add fresh fruit pieces or even a few drops of honey. Make sure the juice is well mixed and all ingredients are evenly distributed. Afterward, pour the juice into a pitcher or a large measuring cup for easy pouring.
Now that the juice is ready, it’s time to move on to the next step – filling the molds.
Fill the Molds
Now it’s time to start filling up your molds with the delicious fruit juice mixture. Here are some tips to make sure your ice pops come out looking and tasting great:
- Use a funnel to pour the juice mixture into the molds. This will help prevent spills and ensure that the juice goes evenly into each mold.
- Leave a little bit of space at the top of each mold. As the juice freezes, it will expand, so you don’t want to fill the mold all the way to the top.
- Add some extra ingredients to make your ice pops even more flavorful. Try adding a few slices of fresh fruit or a sprinkle of herbs like mint or basil.
When you’re finished filling up your molds, it’s time to get creative with some decorating tips. You can dip the frozen pops in melted chocolate or sprinkle them with coconut flakes or crushed nuts. As for flavor combinations, the possibilities are endless! Try mixing different fruit juices together or adding a splash of lemon or lime juice for a tart twist.
Now that your molds are filled and decorated, it’s time to freeze the pops and wait patiently for them to be ready to enjoy.
Freeze the Pops
Once your molds are filled with the delicious fruit mixture, it’s time to let them freeze until they’re ready for you to indulge in. To ensure that your ice pops freeze quickly, there are a few tips that you can follow.
First, make sure that your freezer is set to the coldest temperature possible. This will help speed up the freezing process. Additionally, place the molds in the back of the freezer where it’s the coldest. This will ensure that the ice pops freeze evenly and do not develop ice crystals.
Avoiding ice crystals is important because they can make your ice pops less enjoyable. To avoid them, try covering the molds with plastic wrap before placing them in the freezer. This will help prevent air from getting in and creating ice crystals. Another tip is to gently tap the molds on the counter after filling them with the fruit mixture. This will help remove any air bubbles that might cause ice crystals to form.
Once your ice pops are frozen solid, it’s time to unmold them and enjoy!
Unmold the Pops
Now that our ice pops have frozen, it’s time to unmold them!
First, I run each mold under warm water for a few seconds to loosen the pops from the sides.
Then, I use a release method such as gently twisting or pulling the stick to remove the pop from the mold.
It’s important to be patient and gentle to avoid breaking or melting the pops.
Run Under Warm Water
By running the ice pop molds under warm water, the juice popsicles will easily slide out and be ready to enjoy. The benefits of warm water are that it helps to loosen the ice pops from the molds and prevents them from breaking or cracking. It’s important to control the temperature of the water to ensure that it’s not too hot or too cold, as this can affect the texture and quality of the popsicles.
To run the molds under warm water, follow these simple steps:
- Fill a bowl with warm water.
- Place the ice pop molds in the bowl for 10-15 seconds.
- Gently wiggle the molds to release the popsicles.
Using warm water is a quick and easy way to unmold your ice pops without any hassle. However, if you prefer a different method, you can use a release spray or dip the molds in hot water for a few seconds.
In the next section, we’ll discuss how to use a release method to unmold your juice popsicles.
Use a Release Method
To easily remove your frozen treats from the molds, you can try using a release method like spraying the molds with cooking spray or rubbing them with oil before pouring in your mixture. This will prevent the ice pops from sticking to the mold and make it easier to remove them when they are frozen. There are several benefits of using a release method, including a smoother and more attractive appearance of the ice pops, as well as a reduced risk of the ice pops breaking or becoming damaged during removal.
If you prefer not to use a release method, there are alternatives you can try. One option is to run the molds under warm water for a few seconds to loosen the ice pops, then gently pull them out. Another alternative is to place the molds in a bowl of warm water for a few minutes to thaw the ice pops slightly before removing them. Regardless of which method you choose, be sure to handle the ice pops gently to avoid any breakage. With these tips, you can easily make delicious and refreshing homemade ice pops that are perfect for any occasion. Enjoy your homemade treats!
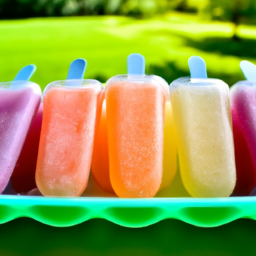
Enjoy Your Homemade Treats!
You can savor your delicious homemade treats and cool off with every refreshing bite. Making ice pops with juice at home isn’t just a fun activity, it also has many benefits.
Here are some ways to customize your ice pops and enjoy them to the fullest:
- Experiment with different fruit juices for unique flavor combinations.
- Add chunks of fresh fruit or herbs for texture and visual appeal.
- Use different molds to create fun shapes and sizes.
- Make them healthier by using natural sweeteners like honey or agave syrup.
With these simple tips, you can make your ice pops as unique and delicious as you want. You’ll also have the added satisfaction of knowing exactly what ingredients are going into your treats. So go ahead and indulge in your cool and refreshing creation!
As you start to experiment with different flavors, you’ll find that the possibilities are endless. From classic combinations like strawberry and banana to more exotic ones like mango and coconut, you can let your creativity run wild. So keep trying new things and have fun with it!
Experiment with Different Flavors
I love experimenting with different flavors when making homemade ice pops with juice. One of my favorite things to do is mix different types of juice together to create unique and delicious flavor combinations.
I also like to add in fresh fruit or herbs to give the ice pops an extra burst of flavor and texture.
Try Mixing Juices
Try mixing different juices to create unique and refreshing ice pops that will surprise your taste buds! Mixing techniques can vary depending on the types of juices you choose, so have fun and try out different combinations until you find your perfect mix. Here are some ideas to get you started:
- Mix orange juice with cranberry juice for a tangy and sweet pop.
- Combine pineapple juice with coconut water for a tropical twist.
- Blend grapefruit juice with lemonade for a zesty and refreshing flavor.
- Try mixing apple juice with pomegranate juice for a fruity and antioxidant-packed treat.
The possibilities are endless when it comes to mixing juice combinations, so don’t be afraid to get creative and try something new. Once you’ve found the perfect blend, pour the mixture into your ice pop molds and freeze for a few hours until fully set.
To add even more flavor and texture to your ice pops, consider adding in some fresh fruit or herbs. This will not only enhance the taste but also make your ice pops look beautiful and appetizing.
Keep reading to learn more about this fun and easy way to take your ice pops to the next level!
Add in Fruit or Herbs
Enhance the flavor and visual appeal of your frozen treats by incorporating fresh fruits or herbs into the mixture. Experiment with different flavor combinations and presentation ideas to create a unique and delicious ice pop. Here are a few ideas to get you started:
| Fruit | Herb | Presentation |
|---|---|---|
| Strawberry | Basil | Layered |
| Pineapple | Mint | Swirled |
| Blueberry | Rosemary | Striped |
By adding in fresh fruit or herbs, you can take your ice pops to the next level. Try mixing and matching different flavors to create a flavor explosion in your mouth. Not only will the fruit and herbs add a burst of flavor, but they will also create a visually appealing treat that is perfect for any occasion.
Now that you have some ideas for enhancing your ice pops, it’s important to also make healthy choices.
Make Healthy Choices
Choosing healthier juice options is an easy way to make your homemade ice pops a healthier treat. Instead of using sugary juice blends, I opt for 100% fruit juice or even vegetable juice options. Not only do these choices provide more vitamins and nutrients, but they also have less added sugar.
Another option is to make your own juice using a juicer or blender, which allows you to control the ingredients and sweetness levels. Making smart choices doesn’t have to be boring either. Finding alternatives such as coconut water, almond milk, or even tea can add unique flavors and health benefits to your ice pops.
Just be sure to check the ingredient list and nutrition information to ensure you’re making the best choice for your dietary needs. With these healthier options, you can enjoy a guilt-free frozen treat that’s not only delicious but also nutritious. Now that we’ve covered how to make healthier choices for your ice pops, let’s get creative with presentation.
Get Creative with Presentation
Spruce up your frozen treats with fun molds and colorful toppings to add a pop of excitement to your presentation.
When it comes to making ice pops with juice, presentation can make all the difference. You can use popsicle molds in different shapes and sizes, such as stars, hearts, or animals, to make your ice pops more appealing. You can also add layers of different flavors or colors to create a fun and unique look.
Another way to make your ice pops stand out is by using colorful toppings. You can dip your ice pops in melted chocolate and sprinkle them with chopped nuts or coconut flakes. Or, you can simply add a slice of fresh fruit or a sprig of mint to each ice pop before freezing.
These presentation tips will not only make your ice pops look amazing, but they’ll also make them taste better by adding extra texture and flavor.
Now that you know how to make ice pops with juice and how to present them in a fun and creative way, it’s time to have fun making memories with your loved ones!
Have Fun Making Memories with Your Loved Ones!
Let’s get together with our fam and friends, whip up some cool treats, and create some epic summer memories! YOLO!
Making ice pops with juice is not only a fun way to cool down on a hot day, but it’s also a great bonding activity. Creating traditions and memories with our loved ones is important, and what better way to do it than by spending quality time together while making delicious treats?
Gather your favorite juice flavors, some ice pop molds, and let the fun begin! Let each person choose their favorite juice and mix it up with some fresh fruit or herbs for an extra flavor boost.
You can even make it a competition and see who can come up with the most unique and tasty ice pop. Take pictures, make videos, and enjoy the moment.
These memories will last a lifetime, and who knows, maybe this ice pop-making tradition will become a regular occurrence in your family or friend group.
Frequently Asked Questions
Can I use fresh fruit instead of juice to make ice pops?
I prefer using frozen fruit instead of fresh when making ice pops. To blend fresh fruit into the mixture, I recommend adding a small amount of liquid and using a blender. This helps create a smooth consistency.
How long should I freeze the ice pops for?
Freezing time for ice pops varies depending on the size of the mold and the ingredients used. Generally, it takes 4-6 hours to freeze. I recommend using silicone molds for easy removal and flexibility.
Can I use regular sugar instead of honey as a sweetener?
Yes, regular sugar can be used as a sweetener instead of honey when making ice pops with juice. Sugar alternatives like stevia or agave can also be used. Experiment with different flavor combinations to create your perfect treat.
How many ice pops does this recipe make?
Like a bee buzzing around a flower, I made a batch of refreshing ice pops with juice. This recipe yields 8 popsicles. For storage, wrap them individually in plastic wrap and store in the freezer. Serve on a hot day for a sweet relief.
Can I add chunks of fruit or other ingredients to the juice before freezing?
Yes, adding chunks of fruit or other ingredients to the juice before freezing can be a great way to add texture and create unique fruit combinations. It’s important to make sure the pieces are small enough to fit in the molds and evenly distributed.
Conclusion
In conclusion, making ice pops with juice is a simple and fun activity that can be enjoyed by people of all ages. It’s a great way to beat the heat and create lasting memories with your loved ones.
As I’m enjoying my homemade ice pop, I’m reminded of the endless summer days spent with my family. The sticky hands, the laughter, and the joy of sharing something delicious together.
The saying goes, "life is like a box of ice pops, you never know what flavor you’re going to get."Whether you choose to experiment with different flavors or make healthy choices, the possibilities are endless.
So, grab your supplies, prepare your juice, and get creative with presentation. And most importantly, have fun making memories with your loved ones!