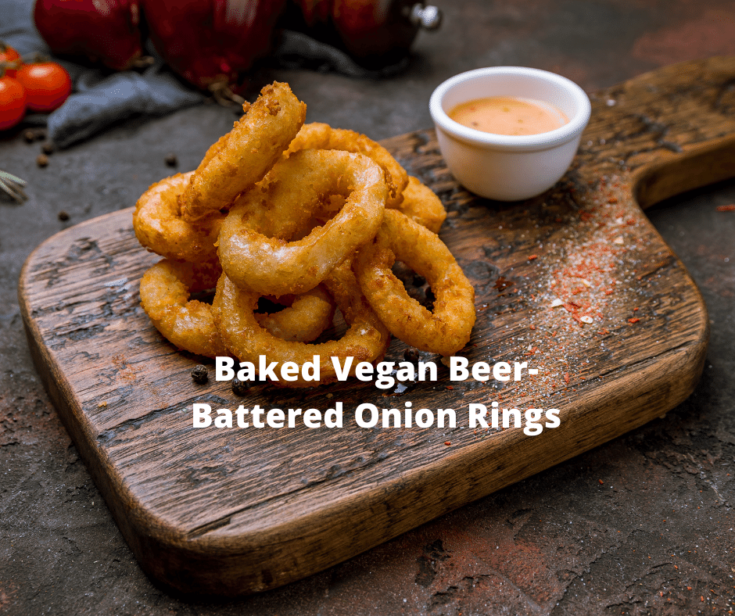
Recipes
Baked Vegan Beer-Battered Onion Rings – the Perfect Appetizer or Main Course!

If you’re looking for a delicious appetizer or main course, look no further than Baked Vegan Beer-Battered Onion Rings. These rings are perfect for any vegan or meat-free meal and easy to make. Plus, they’re super tasty!
Baked Vegan Beer-Battered Onion Rings: The Perfect appetizer or main course!
About those deep-fried onion rings, you’re thinking of…I’m not just talking about the plethora of health problems that come along with them. I’m also referring to how you feel after a few bites–sluggish and unnatural. It’s no longer enjoyable; in fact, it downright sucks. You might as well feel like a fatty long before any of the fat and cholesterol has had a chance to make you one.
Baked Vegan Beer-Battered Onion Rings

Ingredients
- 2 large sweet onions
- For Batter:
- 1/2 cup whole wheat flour
- 2 Tsp cornstarch
- 1 Tsp dijon mustard
- 1/2 cup milk of choice
- 1/2 cup beer
- For Coating:
- 2 cups panko crumbs
- 1 Tsp coarse sea salt
- 2 Tsp granulated garlic
- 2 Tsp paprika
- 2 Tbs olive oil
Instructions
- Preheat the oven to 220 degrees Celsius (430 degrees Fahrenheit) and line the biggest baking sheet with parchment paper.
- I love Panko breadcrumbs because they maintain their crunchiness longer than regular breadcrumbs, and I can't wait to experiment with them in new recipes.
- Start by sifting or whisking together the flour and cornstarch in a bowl to make the batter. Once mixed thoroughly, add in only the milk until the mixture becomes smooth with no lumps.
- Add the mustard and beer, and mix until the batter is as uniform as possible.
- In a separate bowl, mix the panko with the spices. Then, set that bowl aside and begin working on the coating.
- Drizzle the olive oil over the panko using a clean finger and toss it until evenly coated. This will also aid in better mixing the spices; don't be concerned if they didn't blend well in the previous step.
- After that, dice the onions into rings. Remove the papery skin from the onion first by chopping off the end.
- Chop the ham into 1/2-inch thick rings. Separate the rings from one another in a large mixing basin. You won't need most of the tiny ones.
- Before you start, have your three bowls lined up in this order: onion bowl, batter bowl, coating bowl, and baking sheet.
- Submerge your ring into the batter until it is entirely coated, then remove it and shake off any dripping batter.
- Following, using one hand, grab a small handful of coating crumbs. Gently place the ring in the coating bowl with your other hand simultaneously.
- Evenly distribute the crumbs on the onion. Then, take more from the sides and add them to coat the other side of the onion. If your ring is large enough, you can also coat the inside by placing your finger in .")
- Although this may sound complex, it's quite simple. After a few tries, you'll not only understand what I'm saying, but you'll probably develop your strategy.
- Place the current ring on the baking sheet and repeat with each subsequent ring.
- The way to decrease the number of batches is by arranging your onions in a single layer (particularly in the summer). Still, for this recipe's magic to work, the onions must be in a single layer and preferably with as little contact as possible.
- We must find a method to cram as many onion rings as possible into a single batch. I like to employ a mix of human intelligence and a "best-fit" approach to allocating space for things.
- You can look at the onions in your bowl and choose which ring to harvest next with little or no investment (it's not complicated or time-consuming for you). So, start with the biggest ones and fill the baking sheet. Look for the following most oversized rings that will fit inside the ones already on the sheet. Repeat until you run out of space. (Alternatively, you may put some tiny ones between other rings.) More information about similar difficulties is available here.
- Remove the pastry lid, then carefully remove each onion ring with a fork and place it on a serving dish. Bake for 25 minutes or until the rings begin to brown slightly. Suppose you're skilled enough (or have a big oven) only to make one batch, congrats! But if you're like most of us, use this time while the rings are baking to prepare the next batch. Allow cooling for a few moments before eating.
Notes
Here are a few helpful tips before we start:
One: Remember to keep one hand for the batter and the other for coating, or else you'll just have a big mess on both hands. This step is critical!
Two: One of the bowls will run empty before the others. That's just how life is.
Three: When coating onions, it's best to use two bowls of crumbs - that way, once one bowl runs out of dry crumbs, you can simply switch to the second bowl. This process works more efficiently if the bowl is wide and shallow.
Once they’ve been baked, let them cool for a few minutes before serving them as is or put them on top of your favorite burger or vegan sandwich. As with everything else in life, make sure to enjoy your Baked Vegan Beer-Battered Onion Rings!
Conclusion
Baked Vegan Beer-Battered Onion Rings are a perfect appetizer or main course. By following these simple steps, you can make these delicious treats that will tantalize your taste buds. If you’re not familiar with baking, this is an easy task – just follow the recipe given, and you’ll be able to make some fantastic Baked Vegan Beer-Battered Onion Rings!
Ilana has been a vegan for over 10 years. She originally made the switch for health reasons, but soon found herself becoming more and more passionate about the ethical and environmental implications of a vegan lifestyle. Ilana is the author of The Graceful Kitchen, a blog all about veganism. She loves to cook up delicious and nutritious vegan meals, and share her recipes with others who are interested in leading a cruelty-free life. Ilana is also a strong advocate for using whole foods as the foundation of a healthy diet, and believes that going vegan is one of the best ways to achieve this.
Vegan
Grilled Eggplant with Tahini Sauce

This little side dish is one of those finds that I don’t know how I lived without. It’s so simple to prepare, and it’s become a “food hack” in my book – you know, one of those things that are insanely easy yet so delicious? (Why does it have to be a “but”? It looks like the most wonderful things out there are the straightforward ones.)
Traditionally, the eggplant is grilled directly over an open flame and then sliced open and covered with a delectable, lemony, garlicky tahini salad. In reality, I think the flavor of the eggplant is better when cooked conventionally.
Many people don’t have a stove-top with an open flame, and it makes such a huge mess that it’s not worth doing very often. For these reasons, I found you can get nearly the same result by dry-grilling in a pan on the stove top. If you don’t mind making a bit of a mess or if you have an outdoor grill, go ahead and roast the eggplant over the fire. Otherwise, stick with using a pan indoors.
Grilled Eggplant With Tahini

Ingredients
- 1 eggplant (Choose an eggplant that feels lighter than they appear.)
- 1/2 cup raw tahini
- Juice of 1/2 lemon
- 3 cloves of garlic, minced
- 1/2 tsp ground cumin
- Water
Instructions
- First, wash and dry the eggplant. Then, place it in a pan over medium-low heat until it is dry.
- Leave it be. After some time, you'll observe that it will begin to appear "bruised"--it will turn a rusty brown color starting from the bottom and gradually making its way up.
- When the entire top of the eggplant (the side not touching the pan) has become brown (about 20 minutes), turn it over.
- Place the eggplant in a pan with enough water to cover it by about an inch. Bring to a boil over medium-high heat, then reduce the heat and simmer for 20 minutes. Place the pan on a burner or directly over a high heat source and cook until golden brown, 10 to 15 minutes, depending on how thick they are.
- You can make the tahini salad while the eggplant cooks. For the salad, mix minced garlic, lemon juice, and pulp in a jar
- Add the tahini and shake well (with the lid tightly!) until thoroughly combined.
- Start by adding a little water and vigorously shaking until the desired consistency is obtained.
- It's time to harvest your eggplant after it has completely deflated, burned, and shredded.
- Use a knife to cut along the stem of the eggplant, training halfway into the eggplant.
- After that, cut the eggplant in half lengthwise, creating two “boat”-shaped halves.
- Make a crisscross design on the fleshy surface of the bigger one (typically the one with the stem still attached).
- Take the “meat” of the other half, right on top of the half you just cut, and scoop it out. The skin can be composted or saved for vegetable stock.
- Pour the eggplant tahini salad into a slightly deep dish so the tahini doesn't drip out. Sprinkle ground cumin on top.
- It’s all set! If you want to get fancy, grab some honey, date honey, or pomegranate syrup and use it to make a zigzag design on top of the tahini.
- Use the tip of a knife to lightly drag syrup in opposing directions, back and forth, to create a decorative pattern.
Notes
- If you use a thicker syrup, your end product will look better
- If you want to make this dish ahead of time, wait until right before serving to add the tahini, since it will dry out along the edges and won’t look very appealing
.
Tahini Sauce: Tips for Use
Ingredients for tahini sauce can be varied to fit the needs of any meal. To make tahini sauce, you will need:
- 1/2 cup of grapeseed oil
- Three cloves garlic, minced
- 1/4 teaspoon ground ginger
- sea salt and freshly ground black pepper to taste
- 1/4 teaspoon cumin seeds
- juice of 1 lemon (about two tablespoons)
- Two tablespoons white wine vinegar or rice vinegar
- One tablespoon honey
- Three tablespoons water
To make the tahini sauce, heat your oil in a small skillet over medium-high heat. Add the garlic, ginger, and salt, and pepper and cook until fragrant, about 30 seconds. Add in the cumin seeds and continue to cook for another minute. Turn off the heat and strain the mixture into a small bowl. In a separate bowl, whisk together lemon juice, vinegar or rice vinegar, honey, and water until combined. Pour this mixture into the skillet with the garlic mixture and cook for 2 minutes until heated through. Serve immediately on warm toast or use as is for a side dish.
Conclusion
Tahini sauce is a great way to add flavor and texture to your grilled eggplant dishes. By making it yourself, you can vary the recipe and make it as delicious as you want. Tahini sauce is also easy to use – just mix together some tahini sauce, water, and olive oil until desired consistency is reached. Whether you are using it on its own or with other dishes, tahini sauce will add a touch of luxury and flavor to any meal.
Aurelia is the Editor-in-Chief of The Graceful Kitchen, a vegan lifestyle blog that focuses on delicious, nutritious, and ethical eating. A lifelong vegan, Aurelia is passionate about sharing her love of plant-based cuisine with others. She is a regular contributor to several online and print publications, and has been interviewed by major news outlets about the benefits of a vegan diet. In her free time, Aurelia enjoys cooking, hiking, and spending time with her cats.
Recipes
Straightforward Homemade Chili Sauce (Red Chilli Sauce)

Make the ultimate easy homemade chili sauce at home with simply four active ingredients, a few minutes, and also lots of ways to tailor! This red chili sauce is excellent for spreading over sandwiches, covers, burgers, and extra! Vegan, sugar-free, gluten-free, and also can be made oil-free!
Chili is the means to go for any individual wanting to add that little extra spice to their food. Whether you’re utilizing chili oil, chili flakes, chili paste, or this straightforward homemade chili sauce (aka red chili sauce), there are many methods to welcome the warm!
While numerous store-bought hot chili sauce choices are loaded with tons of preservatives and components, this simple homemade chili sauce recipe is the supreme base with simply four essential active ingredients and tons of ways to adjust it, if preferred.
While homemade chili sauce dishes can be loaded with sugars and added active ingredients (i.e., seasonings), this version is a flexible base. It can be taken pleasure in as-is or adapted with additional flavorings.
Depending on just how much flavor you like, you can quickly blend and match different chilies to obtain an excellent choice. In this way, you’ll be slathering it over foods like covers, burgers, and pita and showering it over every little thing!
Chili Sauce (Red Chilli Sauce)

Ingredients
- 1 pound red chilies choose a variety based upon the warmth level you 'd prefer (check notes).
- 2 Tablespoon salt.
- 1/3 cup olive oil.
- 1/2 mug vinegar I used apple cider vinegar.
- Sugar, simply a pinch to preference
- (OPTIONAL) make use of granulated (raw, brown, etc), natural syrup (maple, honey), or sugar-free like erythritol/swerve.
Instructions
- Prepare the peppers. Initially, clean the chili peppers, patting them completely dry with a paper towel. It reduced off the stem (green tops). It's best to wear gloves and avoid touching your face while handling the chilies!
- Next, roughly slice the peppers, maintaining the seeds. You don't need to be as specific with your chopping as whatever will be blended.
- Blend the red chili sauce.
- Add the peppers and the rest of the components to a food mill or blender or food processor and also strike into a sauce.
- Taste the sauce as well as change seasonings as essential.
- Then, move the sauce to a decontaminated container and enjoy it promptly or store it in the refrigerator for longer-term storage.
- Optionally, you can lower this sauce to enlarge it slightly over a hob. Check out the recipe notes for more on that.
Notes
Store the homemade chili sauce in a glass jar (plastic will certainly discolor), for as much as one month in the fridge and as much as four months in the fridge freezer.
Discard it if it begins to taste sour or moldy in any type of way (or has physical indicators of mold).
You might be able to warm water bath can this red chili sauce (and then save it for months in the refrigerator) - nonetheless, it depends on its' pH equilibrium and utilizing the correct approach. If this is something you would love to do, it's finest to get in touch with trusted sources concerning canning things.
Various Peppers as well as their warm levels:.Light: Bell pepper (no heat),
Light: Bell pepper (no heat), Friggitello, Anaheim.
Tool: Poblano, Guajillo.
Hot: Jalapeno, Chipotle, Serrano, Chili pepper.Really Hot: Thai chili (additionally called Bird's eye), Scotch Hood, Habanero.
SUPER Hot: Ghost pepper, Scorpion pepper.
Ilana has been a vegan for over 10 years. She originally made the switch for health reasons, but soon found herself becoming more and more passionate about the ethical and environmental implications of a vegan lifestyle. Ilana is the author of The Graceful Kitchen, a blog all about veganism. She loves to cook up delicious and nutritious vegan meals, and share her recipes with others who are interested in leading a cruelty-free life. Ilana is also a strong advocate for using whole foods as the foundation of a healthy diet, and believes that going vegan is one of the best ways to achieve this.
Recipes
Grilled Cauliflower Steaks

Roasted or barbequed cauliflower steaks are juicy and tender with a crisp, lightly charred, caramelized, and crunchy outside. Perfect as a functional vegan side meal or major to almost any type of dish! Gluten-free, dairy-free, low-carb, paleo, and so on!
Cauliflower’s reasonably empty canvas flavor might make it seem “monotonous” when boiled or steamed. Toss it on the stove, an air fryer, or on a grill. And all of a sudden, this inexpensive, modest component transforms into something altogether brand-new that every person will certainly love!
Refine it into cauliflower rice or create a low-carb cauliflower mash. Or you can make a cauliflower pizza crust, buffalo cauliflower wings, or these barbequed or baked cauliflower steaks!
The high warmth cooking methods help prepare the cauliflower up until tender yet wonderfully caramelized, brownish, and crisp outside. Additionally, barbecuing assists infuse it with an outstanding added “smoky” layer.
Grilled Cauliflower Steaks
And also, all you need for this cauliflower steak dish is just a handful of inexpensive cupboard ingredients, a sharp knife, and an oven or grill. However, there are many means to adapt it to your preference, with alternative flavorings and plenty of topping alternatives. Keep reading for my favorites!
Barbequed or roasted cauliflower steaks are juicy and tender in the center with a crisp, gently charred, caramelized, and crunchy outside. Perfect as a versatile vegan side recipe or main to nearly any kind of meal! Gluten-free, dairy-free, low-carb, paleo, and so on!
No Dull Grilled Cauliflower Steaks Allowed
Cauliflower’s relatively empty canvas taste might make it appear “monotonous” when boiled or steamed. However, toss it in the oven, an air fryer, or on a grill. And also, this low-cost, modest ingredient suddenly changes into something new that everybody will love!
The reality is that cauliflower’s neutral taste makes it so versatile to begin with. It’s additionally helped it become so preferred for meat-free and low-carb eaters. Process it right into cauliflower rice or produce a low-carb cauliflower mash. Or you can make a cauliflower pizza crust, buffalo cauliflower wings, or these barbequed or baked cauliflower steaks!
The high warmth food preparation techniques assist the cauliflower till tender yet splendidly caramelized, brownish, and crisp outside. In addition, grilling aids infuse it with an amazing additional “smoky” layer.
And also, all you require for this “base” cauliflower steak dish is just a handful of inexpensive kitchen ingredients, a sharp knife, and an oven or grill. There are many methods to adjust it to your taste, though, with alternate spices and many coverage options.
Ingredients
At its simplest, you can prepare a cauliflower steak dish with just olive oil, salt, and pepper. I have added simply a couple of even more seasonings for an exceptionally moreish taste!
Cauliflower: Use huge, densely-packed heads of cauliflower that are free from acne and hefty for their size.
Olive oil: When barbecuing, I advise avocado oil or other oil with a high smoke point.
Lemon: Usage fresh lemon juice as opposed to bottled. Raise the taste with lemon passion.
Spices: This cauliflower steak dish utilizes an easy combination of salt, black pepper, smoked paprika, red pepper flakes (OR cayenne pepper/chili powder) with fresh garlic (or garlic powder in a pinch).
Fresh, natural herbs: (optional) to garnish. I.e., flat-leaf parsley, chives, scallions, cilantro, etc.
Roasted or smoked cauliflower steaks are juicy and tender in the center with a crisp, gently charred, caramelized, and crunchy exterior. Refine it into cauliflower rice or produce a low-carb cauliflower mash. Or you can make a cauliflower pizza crust, buffalo cauliflower wings, or these barbequed or roasted cauliflower steaks!
Refine it right into cauliflower rice or produce a low-carb cauliflower mash. Or you can make a cauliflower pizza crust, buffalo cauliflower wings, or these roasted or barbequed cauliflower steaks!
Grilled Cauliflower Steaks

Ingredients
- 1.6 lb cauliflower
- 1/3 cup olive oil
- 0.3 oz garlic 3 cloves
- 1/2 tsp salt
- 1/4 tsp black pepper
- 1/2 tsp red pepper flakes
- 1/4 tsp paprika
- 1/2 lemon (to serve)
Instructions
- For this dish, we are not cutting the cauliflower into florets. So initially, eliminate any outer layer leaves. Then, saturate the whole head in a dish of salt water (or vinegar water). After 15 minutes, wash the head with awesome water and pat it completely dry.
- Chop away the thick extending stem to develop a flat base so it can rest degree on your cutting board.
- Use a long sharp knife to slice the cauliflower head right into pieces (describe the photos on the blog site). I made my own rather slim at around 3/4- inch, as well as I would not recommend trying any kind of thinner.
- If favored, make them thicker (up to 1 1/2 inches); simply note that the cooking time will enhance slightly. There will be some remaining cauliflower after making the pieces.
- Mince the garlic. After that move it to a tiny dish in addition to the oil and all flavorings. Mix well. Utilizing a pastry/silicone brush, freely brush both sides of the cauliflower steaks.
- First, preheat the oven to 400ºF/ 200ºC before cutting the cauliflower steaks, and line a baking tray with parchment paper.
- Prepare the steaks as created above and position them on a parchment-lined baking tray. Roast for 25 minutes in the stove, turning halfway.
- The roasted cauliflower steaks are ready when they're tender in the golden brown, center, and crisp outside.
Notes
At its simplest, you can prepare a cauliflower steak dish with just olive oil, salt, and pepper. I have actually added simply a couple of even more seasonings for an exceptionally moreish taste!
Make in advance: You can slice the cauliflower slices and also prepare the marinate 2 days beforehand, as well as keep them individually in the refrigerator.
Freeze: You can ice up the leftovers for as much as 3 months in a Ziplock bag.
Ilana has been a vegan for over 10 years. She originally made the switch for health reasons, but soon found herself becoming more and more passionate about the ethical and environmental implications of a vegan lifestyle. Ilana is the author of The Graceful Kitchen, a blog all about veganism. She loves to cook up delicious and nutritious vegan meals, and share her recipes with others who are interested in leading a cruelty-free life. Ilana is also a strong advocate for using whole foods as the foundation of a healthy diet, and believes that going vegan is one of the best ways to achieve this.
-
Raw1 year ago
Why Do Raw Beets Irritate My Throat?
-
Beginners Guides1 year ago
If Beets Are Soft Are They Bad?
-
Juice5 months ago
How To Fix Too Much Lemon Juice In Soup
-
Juice5 months ago
How To Make Dmt Vape Juice
-
Vegan1 year ago
List of 16 Brown Fruits Known To Us – You Might Know Some
-
Vegan1 year ago
Is Weetabix Healthy? 14 Things You Should Know
-
Raw9 months ago
Macadamia Nuts – Which is Better Nutrition Raw Or Dry Roasted?
-
Beginners Guides1 year ago
Why Are My Beets Getting Soft?