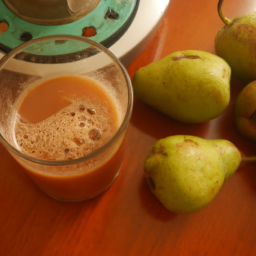
Pears make an ideal choice for creating a delicious and nutritious juice. Whether you’re in search of a refreshing beverage for the warm summer months or a nutritional boost for your immune health, making your own pear juice is the best option.
With the right pears, preparation, and blending techniques, you can create a delicious and satisfying drink that is loaded with health benefits. Pears are packed with essential vitamins, minerals, and antioxidants that can help lower the risk of chronic diseases, improve digestion, and promote a healthy heart. Additionally, pear juice is a great source of hydration, as it contains high water content and natural sugars that can replenish your body’s fluid levels and provide a quick energy boost.
In this article, I will guide you through the process of making your own pear juice, including choosing the right pears, preparing and blending them, and storing the juice for later consumption. So, let’s dive in and discover the secrets of making a sweet, succulent, and nourishing pear juice!
Key Takeaways
- Choose ripe but not overripe pears for best taste
- Juicing or blending pears produces smooth and flavorful juice
- Adding natural sweeteners and flavorings enhances taste
- Properly storing in airtight container in the refrigerator maintains freshness

Elite Gourmet ETS623 BPA-Free 40-Watt Electric Citrus Juicer, Compact, Large Volume, Pulp Control, Oranges, Lemons, Limes, Grapefruits with Easy Pour Spout, 24oz, Black/Stainless Steel
- Powerful Motor: 40W for faster juicing
- Large Capacity: 24oz (3 cups) for batch juicing
- Efficient Extraction: Auto-reversing reamer for more juice
As an affiliate, we earn on qualifying purchases.
As an affiliate, we earn on qualifying purchases.
Choose the Right Pears
When making pear juice, it’s important to choose the juiciest pears you can find, so that the sweet nectar drips down your chin with every sip. To do so, consider the pear’s ripeness and flavor profile.
Pears that are too underripe or overripe can result in a less flavorful juice. Look for pears that are slightly soft to the touch but not mushy, with a bright and even color.
Another factor to consider is the pear’s flavor profile. Some pears, such as Bartlett or Anjou, have a sweeter taste, while others like Bosc or Comice may have a slightly spicy or nutty flavor. Choose the pear variety that best suits your taste preferences.
Once you’ve selected the perfect pears, it’s time to prep them for juicing.
Prep the Pears
First, peel and pit the perfectly ripe pears using a paring knife to ensure a smooth and silky sip of the succulent nectar. When peeling, I prefer to start from the top and work my way down to the bottom, making sure to remove all the skin.
For pitting, I cut the pears in half and use a spoon to scoop out the core and seeds. It’s important to choose pears that are ripe but not overripe, as they’ll provide the perfect balance of sweetness and tartness in the juice.
Once the pears are peeled and pitted, I like to cut them into small pieces to make them easier to blend. I usually cut them into quarters or eighths, depending on their size. It’s important to use a sharp knife to prevent any accidents while cutting.
With the pears prepped and ready to go, it’s time to move onto the next step of making the juice.
Cut the Pears
Now that you’ve got your perfectly ripe pears, it’s time to cut them into small pieces for easy blending. Before you start, make sure you have a sharp knife and a clean cutting board.
Different pear varieties have different textures, so it’s important to choose the right knife for the job. For example, softer pears like Bartlett and Anjou are best cut with a serrated knife, while firmer pears like Bosc and Comice are best cut with a chef’s knife.
When cutting the pears, start by slicing off the stem and bottom ends. Then, stand the pear up on one end and cut it in half vertically. Use a spoon to scoop out the core and seeds. Slice each half into small pieces and add them to your blender. Repeat with the remaining pears until they’re all sliced and ready to go.
Now that the pears are prepped and cut, it’s time to add some flavor and sweetness to the juice.
Add Flavor and Sweetness
To enhance the taste of your homemade pear juice, you’ll want to add some sweetness and flavor using natural ingredients like honey, cinnamon, or ginger. Alternative sweeteners like agave or maple syrup can also be used.
Additionally, you can experiment with different fruit combinations to add depth and variety to your juice. For example, adding apples or grapes can balance out the sweetness and bring a different flavor profile to the mix.
When adding flavorings, it’s important to use them sparingly and taste frequently to avoid overpowering the pear flavor. Start with a small amount and gradually add more to taste.
For sweetness, start with a tablespoon of honey or alternative sweetener per pear and adjust to your liking. For cinnamon or ginger, start with a quarter teaspoon per pear and increase as desired.
By adding these natural ingredients and experimenting with different fruit combinations, you can create a unique and delicious pear juice that is both nutritious and satisfying.
Now that you’ve added sweetness and flavor to your pear juice, it’s time to mix and blend!
Mix and Blend
Once you have all your ingredients ready, it’s time for you to blend and mix them together to create a smooth and flavorful concoction. To achieve the right consistency and flavor, you must use the right blending techniques. Depending on the type of pear you are using, you may need to adjust the blending time and speed.
To make the perfect pear juice, you can use a blender or a juicer. A juicer will extract the juice from the fruit, leaving behind the pulp and fiber. On the other hand, a blender will blend the fruit, pulp, and fiber together, resulting in a thicker juice. Whichever technique you choose, ensure that you blend or juice the pears until they are completely smooth. This will ensure that you get all the nutritional benefits of the fruit. Once your pear juice is blended, it’s time to move on to the next step – straining the juice.
Strain the Juice
Now that I’ve mixed and blended my pear juice, the next step is to strain it.
To ensure a smooth and pulp-free juice, I like to use a fine-mesh strainer. For an even smoother texture, consider using cheesecloth to strain the juice.
Simply pour the juice through the cheesecloth and let it filter out any remaining pulp or sediment.
Use a Fine-Mesh Strainer
Believe it or not, your pear juice will taste even better if you strain it through a fine-mesh strainer. Using a fine-mesh strainer removes any impurities and pulp from the juice, resulting in a smoother and more refreshing taste.
Fine-mesh strainers are beneficial because they are designed to catch smaller particles, such as seeds and pulp, that regular strainers may miss. This ensures that your juice is clear and smooth, making it more enjoyable to drink.
If you don’t have a fine-mesh strainer, you can use alternatives such as a cheesecloth or a coffee filter. However, these options may not be as effective as a fine-mesh strainer, as they may not catch all the small particles.
It’s important to note that straining your pear juice is not only beneficial for its taste, but also for its nutritional content. By removing the pulp, the juice becomes easier to digest and allows for better absorption of nutrients.
So, strain your pear juice through a fine-mesh strainer for a delicious and healthy drink.
Consider Using Cheesecloth
To get an even smoother texture, you could try using cheesecloth to filter out any remaining impurities and create a crystal-clear beverage. Cheesecloth alternatives include nut milk bags or a fine-mesh sieve, but cheesecloth is preferred for its ability to capture even the tiniest particles.
There are several benefits of using cheesecloth in juicing. Firstly, it removes any remaining pulp or seeds that may have been missed during the blending process, resulting in a smoother and more refined drink. Secondly, it ensures that the juice is free from any harmful chemicals or residues that may be present on the skin of the fruit.
To use, simply place a layer of cheesecloth over a large bowl and pour the blended pear mixture onto the cloth. Gather the edges of the cloth and squeeze out the juice. Chill and serve for a refreshing and healthy drink.
Chill and Serve
Once your pear juice is chilled, grab a glass and pour yourself a refreshing drink! Don’t forget to savor the sweet, juicy flavor of your homemade creation. Pear juice is not only delicious but also packed with nutrients and health benefits. It contains vitamins C and K, fiber, and antioxidants that can help boost your immune system, aid digestion, and improve heart health.
To add a touch of elegance to your presentation, serve your pear juice in a tall glass with a slice of pear on the rim. This not only looks visually appealing but also adds a burst of flavor to your drink. It’s a great way to impress your guests with your homemade juice-making skills. Now that your juice is chilled and ready to serve, it’s important to store any leftover juice properly to ensure its freshness.
Store the Juice
Properly storing your homemade pear juice will help maintain its freshness for longer. There are a few storing options that you can choose from depending on how long you plan on keeping your juice. If you plan on drinking it within a day or two, you can store it in an airtight container in the refrigerator.
If you want to enjoy it for longer, you can freeze it in ice cube trays and transfer the cubes into a freezer-safe container. Pear juice can be stored in the freezer for up to three months.
In addition to its delicious taste, pear juice is also a great source of vitamins and minerals. It’s rich in vitamin C, fiber, and antioxidants that can help boost your immune system and improve digestion.
By following these storing options and guidelines, you can ensure that you have access to fresh and nutritious pear juice whenever you want it. Now that you know how to store your juice, let’s experiment with some variations to add some fun and excitement to your juice-making process!
Experiment with Variations
You’re probably wondering how you can add some variety to your pear juice. Well, why not try adding some cinnamon or ginger to give it a warm and cozy flavor? Here are some other flavor combinations you can try to spice up your pear juice:
| Flavor | Ingredients |
|---|---|
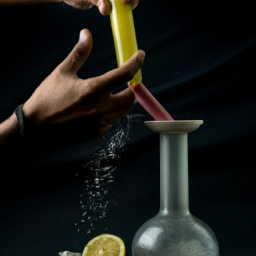
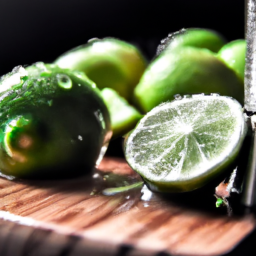
| Spicy | 1 pear, 1/2 inch piece of fresh ginger, 1/2 lemon |
| Sweet and Tart | 1 pear, 1/2 cup of raspberries, 1/2 lemon |
| Refreshing | 1 pear, 1/2 cucumber, 1/4 cup of mint leaves |
| Tropical | 1 pear, 1/2 cup of pineapple, 1/2 cup of coconut water |
Serve your pear juice over ice with a slice of pear or a sprig of mint for a refreshing and healthy drink. You can also experiment with serving it warm during the colder months for a cozy and comforting beverage. Enjoy your homemade pear juice!
Enjoy Your Homemade Pear Juice!
Get ready to savor the delicious taste of your homemade pear juice with a refreshing twist! Not only is pear juice easy to make, but it’s also packed with nutritional benefits.
Pear juice contains high levels of vitamin C, which helps boost your immune system. It also contains fiber, which helps improve digestion and prevent constipation.
To enjoy your pear juice even more, try pairing it with food! Pear juice pairs well with breakfast items such as oatmeal or yogurt. It also complements savory dishes, like roasted chicken or pork.
For a special treat, mix your pear juice with sparkling water or ginger ale for a refreshing spritzer. With all the health benefits and pairing options, drinking pear juice is a great way to enhance your meals and improve your health.
Frequently Asked Questions
Are there any health benefits of drinking pear juice?
Drinking pear juice has many benefits, including providing essential nutrients like Vitamin C and fiber. It can also aid in digestion and boost the immune system. There are many recipes and variations to try for maximum health benefits.
Can I use canned pears instead of fresh pears to make juice?
Using canned pears instead of fresh can save time but may come at a cost. Canned pears are lower in vitamin C and antioxidants, and may contain added sugars. Taste-wise, fresh pears provide a richer flavor and texture.
How long can I store the pear juice in the refrigerator?
I can store pear juice in the refrigerator for up to 3 days. It’s important to keep it covered and chilled to maintain freshness. Pear juice is a nutritious beverage full of vitamins, minerals, and antioxidants.
Can I add other fruits or vegetables to the pear juice for extra flavor?
Adding other fruits or vegetables to pear juice is a great way to boost its nutritional value and flavor. I like to add spinach and ginger for an extra kick. Just be mindful of portion sizes and use a juicer to extract the juice.
What type of blender or juicer is best for making pear juice?
When it comes to making pear juice, a juicer is the best option for retaining the most nutrients. Look for one with a high RPM and wide chute. A blender can work, but may require straining for a smoother texture.
Conclusion
I absolutely adore pear juice! It’s a perfect thirst-quencher, and there’s just something so refreshing about it. Plus, it’s packed full of nutrients like fiber, vitamin C, and potassium.
Making your own pear juice is a breeze, and it’s a great way to ensure you’re getting all of those health benefits without any added sugars or preservatives. To get started, choose the juiciest, ripest pears you can find. Once you’ve prepped and cut them, add a touch of honey or cinnamon for some extra flavor.
Then, mix and blend everything together until you have a smooth consistency, and chill it in the fridge for an hour or two. Voila! Your homemade pear juice is ready to enjoy.
So why not give it a try? Not only is it a tasty treat, but it’s also a fantastic way to keep your body healthy and happy. Just remember to experiment with different variations to find the flavor that suits you best.
Cheers to healthy living and delicious drinks!