Connect with us

Juice

How To Make Mt Olive Pickle Juice

Published

on

I’ve always adored pickles and the zesty, savory flavor they add to dishes. However, what captivates me even more than the pickles is the brine they’re soaked in.

There’s just something about that brine that is so addicting. And that’s why I decided to learn how to make my own Mt Olive pickle juice.

Making pickle juice may seem like a daunting task, but it’s actually quite simple and requires only a few ingredients and some basic kitchen equipment.

In this article, I’ll walk you through the steps to create your own delicious Mt Olive pickle juice. So, grab a jar of pickles and let’s get started!

Key Takeaways

  • Proper sterilization of storage containers is crucial for making safe and long-lasting pickle juice.
  • The ratio of pickles to vinegar solution affects the intensity of the pickle flavor, so it’s important to find the right balance.
  • There are various uses for filtered pickle juice, and it can also provide health benefits.
  • Experimenting with different vegetables and seasonings can lead to a unique and personalized taste.

Gather Your Ingredients

Now, you’re gonna need to grab all your ingredients if you want to start making that delicious Mt Olive pickle juice.

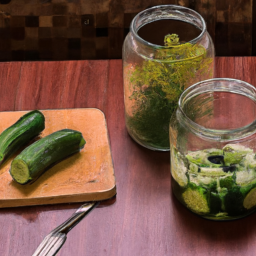
First off, you’ll need to get your hands on some cucumbers. You can use different varieties of cucumbers such as Kirby, Persian, or English cucumbers. It’s important to choose firm and unblemished cucumbers for the best results.

Advertisement

Aside from cucumbers, you can also add other vegetables to your pickle juice such as garlic, dill, and onions. These ingredients will add more flavor to your pickle juice and give it a unique taste. Don’t be afraid to experiment with different vegetables to find the perfect combination for your taste buds.

Now that you have your ingredients, it’s time to move on to the next step, which is sterilizing your storage container.

Sterilize Your Storage Container

Proper sterilization is crucial in maintaining the quality and safety of your homemade pickle juice. Before pouring the hot liquid into your container of choice, make sure to thoroughly wash it with soap and water.

Rinse it thoroughly and then immerse it in boiling water for at least 10 minutes. Dry the container completely before pouring the hot juice.

When it comes to storage containers, there are various options available. Glass jars, plastic containers, and stainless steel bottles are all suitable choices. However, it’s important to choose a container that is non-reactive and doesn’t contain any harmful chemicals that may leach into your pickle juice.

Advertisement

Mason jars with airtight lids are a popular choice for pickling enthusiasts. Once you’ve properly sterilized your container, it’s time to prepare your pickles.

Prepare Your Pickles

Now that my storage container’s sterilized, it’s time to prepare the pickles. First, I’ll need to decide whether to slice or dice them according to my preference.

Then, I can add seasonings such as garlic, dill, or mustard seeds to enhance the flavor.

Slicing or Dicing Pickles

If you want to add some texture to your pickle juice, try slicing or dicing the pickles before adding them to the jar.

Slicing techniques can vary depending on the desired presentation of the pickles in the final product. Some people prefer thin and uniform slices, while others like thicker and more irregular pieces. Dicing the pickles can also add a unique touch to the texture of the pickle juice, creating a chunkier consistency.

Advertisement

When slicing or dicing the pickles, it’s important to use a sharp knife to ensure clean cuts and to prevent squishing or mashing the pickles. Additionally, consider the size and shape of the jar when slicing or dicing the pickles. If using a narrow jar, thin slices may be more practical to fit more pickles in the jar. However, if using a wider jar, thicker slices or even diced pickles can create a more visually appealing presentation.

Once the pickles have been sliced or diced to your liking, it’s time to move on to adding seasonings to the pickle juice.

Adding Seasonings

Enhance the flavor of your homemade pickles by adding a blend of herbs and spices to the brine. The seasoning combinations are endless, but popular choices include garlic, dill, mustard seeds, and red pepper flakes. Experiment with different combinations to find your own signature blend.

Be sure to taste test your brine before adding the pickles to ensure the flavors are balanced. When adding seasonings, it’s important to keep in mind that a little goes a long way. Start with small amounts and gradually add more until you achieve the desired taste. Don’t forget to consider the heat level of your seasonings – some spices can pack a punch!

Once you’ve added your seasonings, allow the brine to sit for a few hours to allow the flavors to meld together.

Advertisement

To transition into the next section, it’s important to note that heating your vinegar solution is necessary to properly dissolve the salt and sugar and allow the seasonings to infuse into the brine.

Heat Your Vinegar Solution

Once you’ve added your salt and water, it’s time to heat up the vinegar solution. This step is crucial because it’ll help dissolve the salt and infuse the flavors of the seasonings you added earlier.

You can either heat up the vinegar solution in a saucepan over medium heat or in the microwave for a few minutes until it reaches a boiling point. Alternative methods, such as using a slow cooker or a sous vide machine, can also be used to heat up the vinegar solution. However, using these methods might take a longer time, but it provides the benefit of infusing the flavors slowly and evenly throughout the solution.

Once the vinegar solution has reached a boiling point, remove it from the heat source and let it cool down to room temperature.

Now that your vinegar solution is ready, it’s time to combine your pickles and vinegar solution. This process will allow the flavors of the seasonings to blend with the pickles and create that delicious tangy taste that we all love.

Advertisement

Combine Your Pickles and Vinegar Solution

After heating up and cooling down the vinegar solution, it’s time to mix it with the pickles to create the perfect tangy flavor. The flavor profile of your pickle juice will depend largely on the ratio of pickles to vinegar solution that you use.

For a more intense pickle flavor, use a higher ratio of pickles to vinegar. If you prefer a milder flavor, use a higher ratio of vinegar to pickles. It’s all about finding the ideal balance for your taste preferences.

To combine the pickles and vinegar solution, simply add the pickles to the cooled vinegar mixture and stir well. Be sure to use a container that is large enough to hold all the pickles and vinegar solution with room to spare.

Allow the mixture to cool in the refrigerator for at least 24 hours before using to ensure the flavors have fully melded together.

Allow the Mixture to Cool

As the steam rises from the freshly combined mixture, it’s time to let it cool down in the refrigerator. Cooling the mixture is a crucial step in the process of making Mt. Olive pickle juice.

Advertisement

Here are a few ideas for discussing the cooling process:

  1. Potential issues: One of the most common issues that may arise during the cooling process is the formation of a cloudy residue. This can be prevented by covering the mixture with a lid or plastic wrap. Additionally, the pickle juice may become too salty if it’s not cooled properly. Therefore, it’s recommended to follow the recommended cooling methods to ensure that the pickle juice is not only clear but also tasty.

  2. Recommended cooling methods: The best way to cool down the mixture is to put it in the refrigerator. Once it’s in the refrigerator, it’s recommended to let it cool down for at least 24 hours before using it. This will allow the flavors to meld together, resulting in a more flavorful pickle juice. Another recommended method is to put the mixture in an ice bath. This will speed up the cooling process, but it may also dilute the mixture slightly.

Now that the mixture’s been cooled, it’s time to strain the pickle juice and enjoy the delicious taste of Mt. Olive pickle juice.

Strain the Pickle Juice

Now that the mixture has cooled, I’m ready to filter out any remaining sediment and extract the tangy essence of the pickles from the brine. To do this, I’ll need a fine mesh strainer or cheesecloth.

I prefer the cheesecloth method as it helps to remove even the tiniest bits of sediment and leaves me with a clearer juice. To strain the pickle juice, I’ll place the cheesecloth over a clean jar and pour the mixture through it.

Once all the juice has been strained, I’ll discard the solids left in the cheesecloth. The filtered pickle juice can now be used in many ways. Some people like to drink it straight for its health benefits, such as replenishing electrolytes and aiding digestion.

Advertisement

Others use it to flavor cocktails, marinades, dressings, and even as a substitute for vinegar in recipes. With the pickle juice strained and ready to use, it’s time to move on to the next step: storing your pickle juice.

Keeping it fresh and flavorful is essential if you want to enjoy it for longer than a few days.

Store Your Pickle Juice

I always make sure to store my pickle juice properly to keep it fresh and flavorful for as long as possible.

The key to proper storage is choosing the right container and using the right techniques.

When it comes to containers, I prefer glass jars or plastic containers with tight-fitting lids to keep air out and prevent contamination.

Advertisement

As for storage techniques, I recommend keeping the pickle juice in the fridge and using it within a few weeks for optimal taste and quality.

Choosing the Best Storage Container

To ensure your homemade pickle juice stays fresh, you’ll want to find the perfect container. Here are some material and size recommendations, as well as proper cleaning techniques to help you choose the best storage container for your pickle juice:

  1. Material Recommendations: The best materials for storing pickle juice are glass or food-grade plastic. Avoid using metal containers as they can react with the acidity of the vinegar in the pickle juice, altering the taste and quality of the juice.

  2. Size Recommendations: Choose a container that is appropriate for the amount of pickle juice you plan to store. A smaller container will prevent the juice from being exposed to too much air, which can cause it to spoil faster. Additionally, a larger container may be more difficult to store in the refrigerator.

  3. Proper Cleaning Techniques: Before storing your pickle juice, make sure to clean your container thoroughly with warm soapy water and rinse it well. Avoid using any harsh chemicals or abrasive sponges that can damage the container’s surface.

By following these material and size recommendations and proper cleaning techniques, you can ensure that your homemade pickle juice stays fresh for a longer period of time. In the next section, I’ll discuss some proper storage techniques for your delicious pickle juice.

Proper Storage Techniques

Ensuring that your homemade pickle juice stays fresh and delicious for as long as possible is crucial. Proper storage techniques will prevent spoilage and keep the flavors intact.

The temperature and duration of storage are key factors to consider when storing your pickle juice. Ideally, the pickle juice should be stored in an airtight container in the refrigerator. The temperature of the refrigerator should be around 40°F. This temperature will slow down the growth of bacteria and keep your pickle juice fresh for a longer period.

Advertisement

It’s important to note that once you’ve opened the jar of pickle juice, it should be consumed within a reasonable time frame. The recommended duration for the storage of opened pickle juice is around 1 to 2 months.

Additionally, leftover pickle juice can be used in a variety of recipes, such as marinades, dressings, or even as a brine for other vegetables. With proper storage techniques, you can enjoy the flavor of homemade pickle juice for a longer period and experiment with a variety of recipes.

Enjoy Your Homemade Pickle Juice

I absolutely love pickle juice! Not only is it a tasty and refreshing beverage, but it also has many uses in cooking and baking.

In this subtopic, we’ll explore the best ways to enjoy your homemade pickle juice. Whether you’re drinking it straight up or incorporating it into your favorite recipes, there are plenty of options.

So go ahead, enjoy your homemade pickle juice. Sip it on its own or use it as a secret ingredient in your next meal. The possibilities are endless!

Advertisement

Drinking Pickle Juice

You can satisfy your craving for a tangy and salty drink by gulping down some pickle juice. It’s also a delicious and refreshing way to quench your thirst. If you’re feeling adventurous, you can even take pickle juice shots as a way to boost your immune system and improve digestion.

But drinking pickle juice isn’t just about satisfying your taste buds. It’s also an excellent way to replenish your electrolytes after a strenuous workout. So next time you hit the gym or go for a run, consider reaching for a bottle of pickle juice instead of sports drinks or sugary sodas. Plus, it’s a more affordable and natural alternative that will leave you feeling energized and hydrated.

And if you’re feeling creative, you can also use pickle juice in recipes to add a zesty flavor to your dishes.

Using Pickle Juice in Recipes

Adding a splash of briny liquid to your marinades or dressings can give your dishes an extra kick of flavor and acidity. One ingredient that can do just that is pickle juice. Not only does it add a tangy taste to your dishes, but it also has some surprising benefits.

Here are a few reasons why you should consider using pickle juice in your recipes:

Advertisement
  • It adds a unique flavor to cocktails that pairs well with vodka or gin.
  • The electrolytes in pickle juice can help athletes replenish their bodies after a workout.
  • It can be used as a substitute for vinegar or lemon juice in salad dressings or marinades.
  • Pickle juice can also be used to marinate meats, giving them a tender and juicy texture.

By experimenting with different ways to incorporate pickle juice into your meals, you can add a distinctive taste that will make your dishes stand out.

Speaking of experimentation, let’s move on to the next section and explore some flavor variations you can try.

Experiment with Flavor Variations

I love experimenting with different flavors when making my own pickle juice. One way to add some extra kick is by incorporating various spices and herbs, such as dill, garlic, or even red pepper flakes.

Additionally, trying out different pickle varieties, like sweet or spicy, can completely change the taste of your homemade pickle juice.

Adding Spices and Herbs

Mix in some garlic and dill for a tangy and flavorful pickle juice. Herbs and spices can make all the difference in the taste of your pickle juice. When it comes to adding flavor to your pickle juice, it’s important to understand the difference between herbs and spices. Herbs come from the leaves of plants, while spices come from the seeds, berries, bark, or roots of plants.

Here’s a table of some common herbs and spices you can add to your pickle juice:

Advertisement
Herbs Spices
Dill Mustard Seed
Garlic Black Peppercorns
Bay Leaves Coriander Seeds
Thyme Cinnamon Sticks
Rosemary Cloves

By adding these herbs and spices to your pickle juice, you can create unique flavor combinations that will make your pickles stand out. Once you’ve experimented with different herbs and spices, you can move on to trying different pickle varieties.

Trying Different Pickle Varieties

Now that we’ve talked about adding spices and herbs to our homemade pickle juice, let’s dive into the fun part – trying different pickle varieties! As someone who loves pickles, I’ve always been curious about how different types of pickles would affect the taste of the juice. So, I decided to conduct a pickle taste test to find out.

Here are some of the varieties I tried and how they affected the flavor of the juice:

  1. Dill Pickles – These classic pickles added a tangy and slightly sour taste to the juice.

  2. Bread and Butter Pickles – These sweeter pickles gave the juice a hint of sweetness and a more complex flavor.

  3. Spicy Pickles – These pickles added a nice kick of heat to the juice, perfect for those who love spicy cocktails.

  4. Garlic Pickles – These pickles gave the juice a strong garlic flavor, perfect for savory cocktails.

Using different pickle varieties can really elevate the flavor of your homemade pickle juice. Not only can you use the juice for pickling vegetables, but you can also use it to create unique pickle juice cocktails. Experiment with different pickle varieties to see which ones you like best!

Frequently Asked Questions

How long can the homemade pickle juice be stored for?

Homemade pickle juice can be stored for up to 2 months in the fridge. It can be used for marinating meat, adding flavor to salad dressings, and as a hangover cure. Drinking pickle juice also has health benefits, such as reducing muscle cramps and aiding digestion.

Advertisement

Can different types of vinegar be used for the solution?

Yes, there are alternatives to vinegar that can be used for pickle juice, such as apple cider vinegar or rice vinegar. These can also create flavor variations depending on personal preference.

Can the recipe be adjusted for a smaller or larger batch of pickle juice?

When adjusting the recipe, I recommend using a ratio of 1:1 for vinegar and water. Start with a smaller quantity and adjust to taste. Remember to use the same ratio for spices and salt. Experiment with different quantities to achieve the desired flavor and acidity in your pickle juice.

Can the same pickles be used multiple times to make more juice?

Yes, I’ve found that using pickles multiple times to make more juice is possible. However, the flavor may vary with each use. It’s best to start with fresh pickles for optimal flavor.

Is it necessary to use a specific type of storage container for the pickle juice?

Using alternative storage options for homemade pickle juice can have numerous benefits. According to a study, using glass containers can reduce the risk of harmful chemicals leaching into the juice. So, it’s worth investing in proper storage to enjoy the full benefits.

Conclusion

Well folks, it’s official. I’m now the master of pickle juice making. If you’re anything like me, you can’t get enough of that tangy, salty goodness. And now, with this recipe, you too can have a never-ending supply of Mt. Olive pickle juice.

Advertisement

Seriously, I never thought I’d be able to make my own pickle juice, but it turns out it’s not that hard. And let me tell you, the taste is unbeatable. Forget about buying expensive pickle juice at the store, now you can have it fresh and homemade.

So go ahead, give it a try and impress all your friends with your newfound pickle juice skills. Trust me, they’ll be begging you for the recipe.

Continue Reading
Advertisement

Juice

How Long Can You Marinate Shrimp In Lime Juice

Published

on

By

As a seafood enthusiast, I thoroughly enjoy experimenting with different methods of preparing shrimp. Marinating shrimp in lime juice is a technique I particularly appreciate as it enhances the flavor and adds a tangy kick. However, a common dilemma arises: how long should shrimp be marinated in lime juice before it starts to affect the texture negatively? In this article, I will share my insights on the best duration for marinating shrimp, as well as explore the factors that play a role in determining this timeframe.

Marinating shrimp in lime juice is an excellent way to add flavor to this versatile seafood, especially if you want to create a zesty and tangy dish. The acidity of the lime juice helps to break down the shrimp’s protein fibers, making it more tender and easier to cook. Moreover, lime juice contains vitamin C, which is an antioxidant that can help to preserve the shrimp’s freshness and prevent bacterial growth.

However, it is crucial to know the optimal marinating time for shrimp in lime juice to achieve the perfect texture and flavor. Let’s dive deeper into this topic and explore the factors that affect the marinating process.

Key Takeaways

  • The optimal marinating time for shrimp in lime juice depends on factors such as shrimp size/freshness and acidity of the lime juice.
  • Short marination times range from 10-30 minutes, medium marination times are 30 minutes to 2 hours, and long marination times can last up to 24 hours but may result in a tough texture.
  • Over-marinating can result in tough, rubbery texture, so it is important to fully coat the shrimp in the marinade and refrigerate during marination.
  • Proper storage, such as storing the shrimp in airtight containers in the fridge and consuming within two days, is essential for freshness and preventing bacterial growth.

The Benefits of Marinating Shrimp in Lime Juice

Marinating shrimp in lime juice not only adds a burst of flavor to your dish, but it also has many health benefits. Lime juice is a great source of Vitamin C and antioxidants, which can help boost your immune system and protect against disease. Additionally, the acidity in the lime juice helps to break down the protein fibers in the shrimp, making them more tender and easier to digest.

The benefits of lime-marinated shrimp are endless. You can use them in a variety of dishes, from traditional ceviche to creative lime shrimp recipes. However, before marinating your shrimp, it’s important to consider a few factors to ensure that your dish comes out perfect.

Factors to Consider When Marinating Shrimp

When it comes to marinating shrimp, there are several factors to consider to achieve the best results. Firstly, the size of the shrimp is important as it can affect the cooking time and the amount of marinade needed.

Advertisement

Secondly, the freshness of the shrimp is crucial as older shrimp can lose their flavor and texture.

Lastly, the acidity of the lime juice used in the marinade should be considered as it can affect the taste and texture of the shrimp.

By taking these factors into account, you can ensure that your marinated shrimp turns out delicious and perfectly seasoned.

Size of the Shrimp

Although smaller shrimp may require less marinating time, it’s still important to consider their size when preparing a recipe that calls for marinating in lime juice.

The general rule of thumb is that the smaller the shrimp, the less time it needs to marinate. This is because the acid in the lime juice penetrates the shrimp more quickly.

Advertisement

For small shrimp, marinating them for 15 to 30 minutes should be enough to achieve the desired flavor. On the other hand, larger shrimp may require up to an hour of marinating time to fully absorb the lime juice.

It’s important to note that over-marinating shrimp can result in a tough and rubbery texture. So, it’s always best to stick to the recommended marinating times based on the size of the shrimp.

Additionally, the cooking time for marinated shrimp may also vary depending on their size. Smaller shrimp may only need a few minutes on the grill or in the pan, while larger shrimp may require a bit more time.

With that said, let’s move on to the next factor to consider when marinating shrimp: the freshness of the shrimp.

Freshness of the Shrimp

Now, it’s crucial to consider the freshness of your shrimp before preparing them for your recipe. Maintaining freshness is important in ensuring that the shrimp are safe to consume and will taste great.

Advertisement

Fresh shrimp should have a mild, oceanic scent and a firm texture. If the shrimp smells strongly of ammonia or has a slimy texture, it’s likely that it has gone bad and shouldn’t be used. Proper handling of the shrimp can also help maintain its freshness.

Shrimp should be stored in airtight containers or bags in the refrigerator and should be consumed within two days of purchase. If you plan on marinating the shrimp, it’s best to do so as soon as possible after purchasing to ensure maximum freshness.

Now that we’ve covered the importance of maintaining freshness, let’s move on to discussing the acidity of the lime juice and its effects on the marinating process.

Acidity of the Lime Juice

To get the perfect flavor in your shrimp dish, it’s important to pay attention to the acidity level of the lime juice you use. This can be achieved by conducting a taste test to determine the pH levels of the juice.

The acidity of the lime juice plays a crucial role in the marination process as it helps to break down the proteins in the shrimp, thus making it tender and easy to cook. Here are some benefits of using lime juice in your shrimp marinade that will surely leave you craving for more:

Advertisement
  • Lime juice is packed with Vitamin C which helps to boost your immune system and keep you healthy.
  • The acidic nature of lime juice aids in digestion, thereby reducing bloating and other digestive issues.
  • Lime juice helps to enhance the flavor of the shrimp by adding a tangy and citrusy taste to the dish.
  • Using lime juice in your marinade can also help to prevent the growth of harmful bacteria in the shrimp.

Now that we have explored the benefits of lime juice and its acidity levels, let’s move on to the next section and tackle the question, ‘how long can you marinate shrimp in lime juice?’ .

How Long Can You Marinate Shrimp in Lime Juice?

When it comes to marinating shrimp in lime juice, there are some general guidelines to keep in mind. Depending on the desired flavor and texture, you can choose between short, medium, or long marination times.

Short marination times typically range from 10-30 minutes, while medium marination times can be anywhere from 30 minutes to 2 hours. Long marination times can last up to 24 hours, but be careful not to over-marinate as the shrimp can become tough and rubbery.

General Guidelines

Typically, you want to marinate shrimp in lime juice for at least 30 minutes to an hour for a good balance of flavor, but if you’re looking for a more intense citrus taste, consider marinating them for up to 2 hours – think of it like letting the shrimp take a refreshing dip in a pool of zesty lime goodness.

The marinade duration is crucial to achieve the desired flavor infusion. It allows the lime juice to penetrate the shrimp meat, breaking down the tough fibers and infusing it with the bright and tangy flavor of lime.

To ensure proper marination, here are three guidelines to follow: 1) Always use fresh lime juice when marinating shrimp. The acidity in lime juice helps to tenderize the shrimp and prevent overcooking. 2) Do not marinate the shrimp for too long, as it can affect the texture and make it mushy. 3) Always marinate the shrimp in a non-reactive container, such as glass or ceramic, to avoid any metallic or acidic reactions that can affect the taste and texture of the shrimp.

Advertisement

With these tips, you can achieve the perfect balance of flavor and texture in your lime-marinated shrimp.

When it comes to short marination times, it’s best to err on the side of caution and not marinate for less than 15 minutes as it may not give enough time for the lime juice to penetrate the shrimp. However, if you’re in a hurry, you can still achieve a mild citrus flavor by quickly tossing the shrimp in fresh lime juice before cooking.

Short Marination Times

If you’re in a rush and need a quick burst of zesty flavor, a brief dip in fresh citrus could give your shrimp a tangy kick. Short marination times can range anywhere from 15 minutes to an hour, and they’re perfect for those who want to whip up quick recipes without sacrificing flavor. During this time, the shrimp will absorb some of the lime juice, resulting in a tangy, slightly acidic taste that pairs well with a variety of other flavor combinations.

To give you an idea of how long you can marinate shrimp in lime juice, take a look at this table:

Marination Time Shrimp Texture Flavor Profile
15-30 minutes Firm and slightly opaque Tangy and slightly acidic
30-45 minutes Tender and slightly pink Bright and zesty
45 minutes – 1 hour Soft and fully cooked Bold and flavorful

As you can see, even a short marination time can make a big difference in both the texture and flavor of your shrimp. However, if you’re looking for a more pronounced lime flavor, you may want to consider medium marination times.

Advertisement

Medium Marination Times

Now that we’ve covered the benefits of short marination times for shrimp in lime juice, let’s move onto medium marination times. When marinating shrimp for a longer period, it’s important to remember that lime juice can start to cook the shrimp, resulting in a tougher texture.

For medium marination times, I recommend marinating the shrimp for 30 minutes to 1 hour. During this time, the shrimp will absorb the flavors of the lime juice while still maintaining its tender texture.

If you’re looking for alternative marinades, you can also try mixing lime juice with other citrus juices like lemon or orange. Additionally, you can experiment with adding herbs and spices to the marinade, such as cilantro, cumin, and chili powder. These additions will not only add flavor but also help to balance out the acidity of the lime juice.

When it comes to cooking techniques for shrimp marinated in lime juice, grilling and broiling are great options. These methods will help to caramelize the sugars in the marinade and add a smoky flavor to the shrimp. Another option is to sauté the shrimp in a pan with butter and garlic, creating a rich and flavorful dish.

Moving onto long marination times, it’s important to be mindful of the potential texture changes in the shrimp.

Advertisement

Long Marination Times

For the best results, be mindful of how much time you’re leaving your shrimp to soak in the acidic marinade. Long marination times can result in a tougher texture and a less desirable flavor. However, if done correctly, marinating shrimp in lime juice for an extended period can add a unique and delicious twist to your dish.

When it comes to marination techniques, there are a few things to keep in mind. First, make sure the shrimp is fully coated in the lime juice marinade. Second, refrigerate the shrimp while it’s marinating to prevent bacterial growth. Finally, consider adding other ingredients to the marinade to create flavor variations. For example, adding garlic, cilantro, or chili peppers can add a spicy kick to your dish.

Moving on to the next section, signs of over-marinated shrimp can include a rubbery texture and an overpowering acidic taste. To avoid this, it’s important to monitor the marination time and adjust accordingly.

Signs of Over-Marinated Shrimp

When marinating shrimp in lime juice, it’s important to monitor the duration of the process to avoid over-marinating. Over-marinated shrimp can exhibit changes in texture, color, and smell, which can affect the overall quality of the dish.

As a chef, I always keep an eye out for these signs to ensure that my shrimp is perfectly marinated and ready to be served.

Advertisement

Texture

If you marinate your shrimp in lime juice for too long, they can become rubbery and tough, which is why it’s recommended to only marinate them for 30 minutes to an hour for optimal texture. Achieving optimum texture is crucial in order to fully enjoy the taste of your shrimp. Interestingly, a study found that marinating shrimp in lime juice for as little as 15 minutes can enhance its texture and flavor. This is because the acid in the lime juice starts to break down the proteins in the shrimp, making it more tender and juicy.

To further understand the effects of marinating shrimp in lime juice, here is a table showing the changes in texture and flavor depending on the duration of marination:

Marination Time Texture Flavor Combinations
0-15 minutes Tender Citrusy, slightly sweet
30 minutes – 1 hour Optimal Balanced, tangy
2 hours or more Tough Overpowering, sour

As you can see, marinating shrimp for too long can lead to a tough and sour taste. In the next section, we will explore the effects of marination on the color of shrimp.

Color

As we discussed earlier, the texture of the shrimp can be affected by how long it’s marinated in lime juice. But did you know that the color of the shrimp can also be influenced by the marinade?

Lime juice can actually brighten the color of the shrimp, making it look even more appetizing. This is due to the acidity of the lime juice, which can help to break down any pigments that might be present.

Advertisement

Not only does the acidity of the lime juice affect the color of the shrimp, but it also adds a citrus flavor that pairs perfectly with seafood. To enhance this flavor, you can add other citrus fruits to the marinade, such as lemon or orange.

Here are three ways that marinating shrimp in lime juice can improve the color and taste:

  1. The acidity of the lime juice can brighten the color of the shrimp.
  2. Adding other citrus fruits to the marinade can enhance the citrus flavor.
  3. Lime juice can help break down any pigments that might be present in the shrimp.

As we move on to the next section, it’s important to remember that the smell of the shrimp can also be influenced by the marinade. So let’s explore how long you should marinate shrimp in lime juice to achieve the perfect balance of flavor and aroma.

Smell

The smell of the shrimp can be greatly affected by the marinade, so it’s important to consider the ingredients used. Lime juice is a common ingredient in shrimp marinades, and while it adds a tangy flavor, it can also mask the smell of the shrimp. However, if not prepared correctly, the lime juice can also overpower the shrimp’s natural aroma.

To properly prepare the shrimp for marination, it’s important to first rinse them thoroughly to remove any debris or excess salt. Next, pat them dry with a paper towel to remove any excess moisture. Once the shrimp are ready, they can be placed in a bowl or resealable plastic bag with the marinade ingredients. It’s important to ensure that the shrimp are fully coated in the marinade and that there is enough marinade to cover them completely.

Ingredient Effect on Smell
Lime Juice Masks the smell
Garlic Adds a strong aroma
Cilantro Adds a fresh, herbal scent
Chili Pepper Adds a spicy aroma
Soy Sauce Adds a savory, umami scent

When the shrimp have finished marinating, it’s important to store them properly to prevent any contamination. This can be done by placing them in an airtight container in the refrigerator, where they can be stored for up to two days.

Advertisement

How to Store Marinated Shrimp

When it comes to storing marinated shrimp, there are two main options: refrigeration and freezing. As someone who’s cooked shrimp countless times, I’ve found that refrigeration is the best option for short-term storage.

It’s important to note, however, that frozen shrimp can last for a significantly longer period of time if stored properly.

Refrigeration

To keep your marinated shrimp fresh, make sure you refrigerate them for at least an hour before serving. Proper storage is essential to prevent bacteria growth and spoilage. The optimal temperature for storing marinated shrimp is between 32°F and 40°F. This means that you should store your marinated shrimp in the coldest part of your refrigerator, such as the bottom shelf or the crisper drawer.

Here is a table to give a better idea of the ideal storage temperature and duration for marinated shrimp:

Storage Method Temperature Duration
Refrigeration 32°F to 40°F 1 to 2 hours
Freezing 0°F or below Up to 3 months

After refrigeration, you can serve your marinated shrimp as is or cook them according to your preferred method. However, if you’re not planning to serve your marinated shrimp right away, freezing them is a great option to prolong their shelf life.

Advertisement

Freezing

If you want to keep your marinated shrimp fresh for up to three months, consider freezing them in the coldest part of your freezer. Freezing is a great way to extend the shelf life of your shrimp without compromising the quality or taste.

Here are some freezing and thawing techniques to help you enjoy your marinated shrimp for months to come:

  • Make sure your shrimp are fully submerged in the lime marinade before freezing.
  • Place the shrimp and marinade in an airtight container or freezer bag, removing as much air as possible.
  • Label the container with the date and contents before placing it in the freezer.
  • When thawing the shrimp, do so slowly in the refrigerator overnight, rather than using hot water or a microwave.

By following these simple steps, you can ensure that your marinated shrimp will retain their flavor and texture when thawed.

Now that you know how to freeze and thaw your shrimp properly, let’s move on to some tips for achieving the perfect lime-marinated shrimp.

Tips for Achieving the Perfect Lime-Marinated Shrimp

You’ll want to make sure your shrimp are fully coated in lime juice to give them a zesty kick that will knock your socks off! When marinating shrimp in lime juice, there are a few tips to keep in mind.

First, make sure to use fresh lime juice rather than bottled lime juice for the best flavor. It’s also important to fully coat the shrimp in the lime juice and let it marinate for at least 30 minutes, but no longer than 2 hours. If you marinate the shrimp for too long, the acid in the lime juice can actually start to cook the shrimp, resulting in a tough and rubbery texture.

Advertisement

If you want to try something different, there are alternative marinades you can use for your shrimp. For example, you can try a mixture of lime juice, garlic, and olive oil for a more savory flavor. You can also experiment with different cooking techniques, such as grilling or sautéing the shrimp with lime juice and spices.

However you choose to cook your shrimp, the important thing is to make sure they are fully cooked and safe to eat.

In the next section, we’ll explore other ways to cook shrimp with lime.

Other Ways to Cook Shrimp with Lime

I’m excited to discuss other ways to cook shrimp with lime!

Grilling is a great option for getting that smoky, charred flavor. Simply skewer the shrimp and brush with a mixture of lime juice, oil, and spices before cooking over high heat.

Advertisement

Sauteing is another quick and easy method that allows the shrimp to absorb the tangy lime flavor. Toss the shrimp in a hot pan with butter, garlic, and lime juice for a delicious and aromatic dish.

Lastly, baking the shrimp allows for a hands-off approach that yields juicy and tender results. Place the shrimp in a baking dish with lime zest, butter, and any other desired seasonings before baking at 375°F for 10-12 minutes.

Grilling

Hey, grilling enthusiast, why not try marinating your shrimp in lime juice for a zesty twist on your next seafood dish?

Grilled shrimp is a classic dish that can be enjoyed in a variety of ways, but marinating your shrimp in lime juice can take it to the next level. The acidity of the lime juice helps to break down the shrimp’s protein, resulting in a tender and flavorful dish.

To prepare your shrimp for grilling, start by cleaning and deveining them. Then, place them in a bowl and pour in enough lime juice to fully coat them. You can also add in other ingredients such as garlic, cilantro, or chili powder to further enhance the flavor.

Advertisement

Let the shrimp marinate for at least 30 minutes, or up to 2 hours for a more intense flavor.

Now, on to sauteing.

Sauteing

If you want to add some extra flavor and texture to your dishes, sauteing is a great cooking technique to try out. Sauteing involves cooking ingredients quickly over high heat, usually in a pan with a small amount of oil or butter. This method is perfect for cooking shrimp, as it allows you to infuse the shrimp with different flavor combinations and create a crispy exterior.

To make the most out of sauteing, it’s important to pair the right ingredients together. For example, if you’re looking for a classic combination, try sauteing shrimp with garlic and butter. If you want something a little more unique, you can try sauteing shrimp with ginger and soy sauce. The possibilities are endless, and experimenting with different flavor combinations is the best way to find your favorite shrimp saute recipe.

Moving on to the next section about baking, there are other techniques that can be used to cook shrimp.

Advertisement

Baking

Get ready to elevate your shrimp game by learning how to bake them to perfection! Baking with shrimp is a great way to cook them without worrying about overcooking or undercooking.

To start, make sure to properly marinade your shrimp before baking. A great marinade recipe for shrimp is a combination of lime juice, garlic, salt, pepper, and olive oil. Simply mix all the ingredients together and toss the shrimp in the marinade for at least 15 minutes, but no longer than 30 minutes.

Preheat your oven to 375°F and line a baking sheet with parchment paper. Arrange the shrimp in a single layer on the baking sheet and bake for 8-10 minutes, or until they turn pink and opaque. Be careful not to overcook them as they can become rubbery.

Once done, remove the shrimp from the oven and let them cool for a few minutes before serving. Baked shrimp can be served as a main dish, appetizer or added to salads for an extra protein boost.

When it comes to handling shrimp, it’s important to take safety precautions. The next section will cover some important tips to keep in mind when handling raw shrimp.

Advertisement

Safety Precautions When Handling Shrimp

When handling shrimp, it’s important to tread lightly and treat them like delicate glass figurines, as they can easily break and cause harm. Proper cleaning is key to ensuring that you handle shrimp safely.

Start by removing the head and shell, and then deveining them. Rinse them thoroughly under cold running water and pat them dry with paper towels.

When it comes to cooking methods, there are several options available such as grilling, baking, boiling, and frying. Regardless of the method you choose, ensure that the shrimp is cooked thoroughly to avoid the risk of foodborne illnesses.

Remember to always follow food safety guidelines and avoid cross-contamination by using separate utensils and cutting boards for raw and cooked shrimp. Now that we’ve covered some safety precautions, let’s move on to common mistakes to avoid when marinating shrimp.

Common Mistakes to Avoid When Marinating Shrimp

Marinating shrimp can be a delicious way to add flavor to your seafood, but be careful not to make these common mistakes.

Advertisement

One mistake to avoid is over salting. Shrimp are naturally salty, so be mindful of the amount of salt you add to your marinade. It’s easy to go overboard and ruin the dish. As a general rule, start with a small amount of salt and adjust as needed.

Another common mistake to avoid is marinating shrimp for too long. While marinating shrimp in lime juice can help to tenderize the meat, leaving it in the marinade for too long can actually have the opposite effect. The acid in the lime juice can break down the proteins in the shrimp, making it mushy and unappetizing.

A good rule of thumb is to marinate shrimp for no longer than 30 minutes to an hour. If you want a stronger flavor, consider adding more spices or herbs to the marinade instead of leaving it in for longer.

By avoiding these common mistakes, you can create a delicious, perfectly marinated shrimp dish every time.

Frequently Asked Questions

Can you use other citrus fruits instead of lime juice to marinate shrimp?

When marinating shrimp, citrus alternatives such as lemon, orange, or grapefruit can be used instead of lime juice. Each option offers a unique flavor comparison. As a chef, I recommend experimenting with different citrus fruits to find your preferred flavor profile.

Advertisement

Is it safe to marinate shrimp for more than 24 hours in lime juice?

Marinating shrimp in lime juice for more than 24 hours can pose safety concerns due to the acidic nature of the juice. Additionally, the flavor impact may become overpowering. It is recommended to marinate for 2-4 hours for optimal flavor without compromising safety.

How do you know if the shrimp is properly marinated?

When assessing shrimp marinade, look for color change and firmness in texture. Tips for maximum flavor include ensuring even distribution of marinade, and allowing for ample time to penetrate the shrimp.

Can you freeze shrimp after marinating them in lime juice?

Freezing shrimp after marinating them in lime juice has pros and cons. While it can extend the shelf life, the texture may suffer. Alternative citrus fruits like lemon or orange can yield similar results. Taste test results may vary.

Can you reuse the marinade for another batch of shrimp?

Reusing marinade is risky due to bacterial growth. Experiment with alternative citrus juices for unique flavors. Discard marinade after use to prevent contamination. Always follow safe food handling practices.

Conclusion

In conclusion, marinating shrimp in lime juice is a delicious and healthy way to add flavor and texture to your meals. The benefits of marinating shrimp in lime juice are numerous, including increased tenderness, enhanced flavor, and improved nutritional value. However, it’s important to consider several factors when marinating shrimp, such as the type of shrimp, the acidity of the lime juice, and the desired flavor profile.

Advertisement

When it comes to marinating shrimp in lime juice, the length of time is crucial. While it’s generally recommended to marinate shrimp for no more than 30 minutes to 1 hour, the exact timing will depend on the size and type of shrimp. Over-marinated shrimp can become tough and rubbery, so it’s important to pay close attention to the signs of over-marination, such as a change in color or texture.

With the right techniques and precautions, you can achieve the perfect lime-marinated shrimp. Impress your guests and leave them craving for more.

Continue Reading

Juice

How Long Can Green Juice Last In The Fridge

Published

on

By

Why is green juice so great? It’s packed with nutrients, delicious, and full of vitamins and minerals that can give you the boost of energy you need to power through your day.

And you know what’s not so great about green juice? It can go bad pretty quickly if you don’t store it properly.

But fear not, my fellow green juice enthusiasts! In this article, I’m going to share with you everything you need to know about how long green juice can last in the fridge.

We’ll talk about the science behind the shelf life of green juice, tips for maximizing its freshness, the best storage containers, and even what to do with expired juice.

So, let’s dive in and make sure that your green juice stays fresh and delicious for as long as possible.

Advertisement

Key Takeaways

  • Green juice shelf life depends on the produce, juicing method, and storage.
  • Airtight containers in the fridge limit oxygen contact and prevent spoilage.
  • Adding lemon juice or apple cider vinegar helps preserve green juice.
  • Longer storage in the fridge leads to more contamination by harmful bacteria, so consume as soon as possible after making for maximum nutritional benefits.

The Importance of Storing Green Juice Properly

You don’t want to waste that delicious green juice, so make sure to store it properly in an airtight container to keep its vibrant color and fresh taste. This is because green juice is highly susceptible to juice oxidation, which can cause it to spoil quickly.

Juice oxidation happens when oxygen comes into contact with the juice, leading to a loss of nutrients and a change in flavor. Preventing spoilage is crucial, as it can significantly impact the shelf life of your green juice.

One way to prevent juice oxidation is to store your juice in an airtight container in the fridge, which will limit the amount of oxygen that comes into contact with the juice. Additionally, you should consume your juice as soon as possible after making it, as the longer it sits, the more it will oxidize and spoil.

Understanding the shelf life of green juice is essential for ensuring that you get the most out of your juice and keep it fresh and delicious for as long as possible.

Understanding the Shelf Life of Green Juice

When storing homemade vegetable juice, it’s important to keep in mind how quickly it can spoil. The shelf life of green juice depends on several factors, including the type of produce used, the juicing method, and how it’s stored.

Generally, green juice can last up to 72 hours in the refrigerator, but this can vary based on these factors. One of the most common spoilage signs to look out for is a change in color or texture. If the juice appears darker or thicker than when it was first made, this may indicate that it has started to go bad. Additionally, if there is a sour or off smell, this could also be a sign that the juice is no longer fresh.

Advertisement

By understanding these factors affecting shelf life and common spoilage signs, you can better assess the freshness of your green juice before consuming it. To maximize the freshness of green juice, there are several tips to keep in mind.

One of the most important is to store it in an airtight container in the refrigerator as soon as it’s made. This will help prevent oxidation and keep the juice from spoiling too quickly. Additionally, adding a small amount of lemon juice or apple cider vinegar to the juice can help preserve it for longer.

By following these tips, you can ensure that your green juice stays fresh and nutritious for as long as possible.

Tips for Maximizing the Freshness of Green Juice

To keep your homemade vegetable juice as fresh as a newly picked apple, store it in an airtight container in the refrigerator right after juicing and consider adding a splash of lemon juice or apple cider vinegar for prolonged preservation. These acidic agents can help prevent oxidation, which is the main cause of spoilage in green juice. Additionally, it is important to consume the juice as soon as possible to maximize its nutritional benefits, especially if you are on a juice cleansing program. In general, green juice can last for up to 72 hours in the fridge, but its quality and flavor may deteriorate over time.

To ensure that your green juice stays fresh and delicious, you can use the following table as a guide for the shelf life of common juicing recipes:

Advertisement
Juicing Recipe Refrigerator Shelf Life Freezer Shelf Life
Kale, Apple, Ginger 2-3 days 1-2 months
Spinach, Cucumber, Lemon 2-3 days 1-2 months
Carrot, Beet, Orange 3-4 days 2-3 months

As you can see, some recipes may last longer than others, depending on the ingredients and their natural properties. However, it is always recommended to consume your green juice as soon as possible, especially if you are trying to reap its health benefits. In the next section, we will discuss the best storage containers for green juice to help you keep your juice fresh and delicious for longer.

The Best Storage Containers for Green Juice

If you want your homemade vegetable juice to stay fresh and flavorful, consider investing in the right storage containers. The type of container you use can have a significant impact on the shelf life of your green juice.

Here are some options to consider:

  • Mason jar vs. plastic container: Both are great options, but mason jars tend to keep juices fresher for longer due to their airtight seal. Plastic containers are also great for storage, but they may not be as durable in the long run.

  • Vacuum sealing vs. regular sealing: Vacuum sealing can help prolong the shelf life of your green juice by removing all of the air from the container. This can help prevent oxidation and spoilage. However, regular sealing with an airtight lid can also be effective in keeping your juice fresh.

When it comes to storing green juice, it’s important to choose the right container and sealing method to ensure maximum freshness.

In the next section, we’ll discuss another option for extending the shelf life of your green juice: freezing.

Advertisement

Freezing Green Juice

I’ve found that freezing green juice can be a great option for preserving its nutrients and freshness. However, there are both pros and cons to this method.

On the one hand, freezing can extend the shelf life of your juice, allowing you to enjoy it over a longer period of time. On the other hand, freezing can alter the taste and texture of the juice, so it’s important to know how to freeze green juice properly.

Pros and Cons

Take note of the positives and negatives when it comes to preserving your green juice in the fridge. While keeping your juice in the refrigerator is a convenient way to extend its shelf life, there are several factors that can impact its nutritional value and taste preferences.

Here are a few things to consider:

  • Pros: Refrigerating green juice can help slow down the oxidation process and maintain its nutrient content for up to 72 hours. It’s also a space-efficient method of storage that allows for easy access and consumption throughout the day.

  • Cons: However, storing green juice in the fridge for too long can cause it to lose its freshness and flavor. The longer it sits, the more it can become contaminated with harmful bacteria, which can lead to food poisoning and other health issues. Additionally, exposing the juice to light and air can cause it to degrade and lose its nutritional potency.

To overcome these limitations, it’s important to use airtight containers and store the juice in the coldest part of your refrigerator. It’s also recommended to consume your green juice within 24-48 hours of making it to ensure maximum freshness and nutritional value.

Advertisement

Now, let’s move on to the next topic: how to freeze your green juice.

How to Freeze Green Juice

Freezing your beloved nutrient-rich green juice is a simple and practical solution to ensure that you never have to say goodbye to your favorite healthy drink again.

There are various techniques to freeze green juice, but the key is to preserve the freshness and nutrients as much as possible. One method is to use ice cube trays, which allow you to portion out the juice and easily defrost it later. Simply pour the green juice into the trays and freeze it until solid. Once frozen, transfer the cubes into a freezer-safe container or bag.

Another method is to freeze the juice in airtight containers. Ensure that the container is filled to the top to minimize the amount of air exposure, which can cause freezer burn and affect the quality of the juice.

To preserve the nutrients and avoid deterioration, it’s important to freeze green juice as soon as possible after making it. Green juice can be stored in the freezer for up to 6 months, but it’s ideal to consume it within 2-3 months for optimal freshness.

Advertisement

When you’re ready to enjoy your frozen green juice, it’s important to thaw it properly to maintain its quality. This will be discussed further in the next section.

Thawing Frozen Green Juice

To thaw frozen green juice, simply place it in the fridge overnight. This is the most effective thawing technique as it preserves the flavor of the juice and prevents any unwanted bacteria growth. However, if you’re in a hurry, you can also thaw the juice by placing it in a bowl of warm water for a few minutes. Just make sure to transfer the juice to the fridge immediately afterwards to keep it fresh.

To enjoy your thawed green juice, here are some tips:

  • Shake the bottle well before drinking to ensure all the nutrients are evenly distributed.
  • Drink the juice within 24-48 hours of thawing to ensure maximum freshness.
  • If the juice has separated or has a different texture than before, blend it or shake it again to restore its original consistency.
  • If you notice any changes in color or smell, discard the juice immediately as it may have gone bad.
  • Consider adding fresh citrus juice or herbs to the thawed juice to rejuvenate the flavor.

Now that you know how to properly thaw your green juice, let’s explore some ways to rejuvenate it and make it taste even better.

Rejuvenating Green Juice

Now that you’ve got your thawed green juice, let’s spice things up with a little creativity and experimentation – after all, variety is the spice of life!

Green juice is known for its health benefits, but did you know that it can also be a delicious and rejuvenating beverage? Here are some of the top ingredients to add to your green juice to give it a tasty kick:

Advertisement

First, try adding some ginger to your juice. Not only does ginger have anti-inflammatory properties, but it also adds a spicy flavor that can help wake you up in the morning.

Another great ingredient to add is lemon. Lemon is packed with vitamin C and can give your juice a tangy flavor.

Lastly, try adding some apple to your juice. Apples are high in fiber and can give your juice a hint of sweetness. By experimenting with different ingredients, you can create a unique and rejuvenating green juice that you’ll love!

Now, if you find yourself with expired green juice, don’t fret. There are still alternative uses for it, such as using it as a base for a salad dressing or adding it to a smoothie for an extra boost of nutrients.

Remember, green juice can last up to 72 hours in the fridge, so be sure to use it up before it goes bad.

Advertisement

Alternative Uses for Expired Green Juice

Don’t worry if your green juice has expired, there are still plenty of creative ways to repurpose it for added nutritional benefits! Instead of throwing it away, consider using it in creative recipes or DIY beauty products. Not only will you be reducing food waste, but you’ll also be getting extra nutrients and hydration for your body and skin.

Here are some ideas for alternative uses for expired green juice:

Creative Recipes DIY Beauty Products
Use as a base for soups or stews Mix with honey and olive oil for a hydrating face mask
Use in smoothies or as a salad dressing Mix with sea salt and coconut oil for a body scrub
Freeze into ice cubes and add to water or other drinks Use as a hair rinse to add shine and moisture

By repurposing your expired green juice, you can still benefit from its nutritional value and reduce food waste. However, it’s important to consider safety considerations when using expired food products.

Safety Considerations

It’s crucial to be mindful of safety when dealing with expired produce, including green juice, to avoid potential health risks. Here are three important considerations to keep in mind when it comes to the shelf stability of green juice:

  1. Shelf stability is affected by various factors, such as the pH level of the juice, the presence of preservatives, and the packaging used. Green juice with a lower pH level and no preservatives typically has a shorter shelf life than juice with higher pH and added preservatives.

  2. Microbial growth is a major concern with expired green juice. The presence of bacteria, yeast, and molds can lead to spoilage and potential health risks. It’s important to be aware of any signs of spoilage, such as a sour or off odor, cloudy appearance, or visible mold.

  3. Proper storage is crucial for maintaining the shelf stability of green juice. It should be stored in airtight containers and kept refrigerated at all times. Once opened, the juice should be consumed within a few days to avoid microbial growth and spoilage.

By following these safety considerations, you can ensure that your green juice remains safe for consumption and minimizes the risk of potential health hazards.

Advertisement

Frequently Asked Questions

What are the health benefits of drinking green juice?

When it comes to the benefits of juicing, green juice is a powerhouse of nutrients. Drinking it in the morning on an empty stomach is the best time to maximize its benefits. It can improve digestion, boost energy, and support immune function.

Can the nutritional value of green juice be preserved if it is left out at room temperature?

Preserving nutrients in green juice is best achieved through refrigeration, as leaving it out at room temperature can cause it to lose its nutritional value. It is important to store green juice properly to maintain its health benefits.

How long can you store green juice in the freezer?

I store green juice in the freezer for long term storage. When ready to consume, I defrost in the fridge overnight. Although some nutrient loss may occur, the overall quality of the juice remains intact.

Can you mix different types of fruits and vegetables in green juice?

Did you know that combining certain fruits and vegetables in green juice can create a powerful health boost? Creative blends like carrot-ginger and kale-apple are some of the best pairings. Experiment and find what works for you!

Is it safe to consume green juice that has been left out for more than a day?

It is not safe to consume green juice that has been left out for more than a day due to the risk of bacterial growth and foodborne illness. Proper storage and attention to shelf life is crucial for maintaining food safety.

Advertisement

Conclusion

In conclusion, as someone who regularly drinks and stores green juice, I can attest to the importance of proper storage to maximize freshness and shelf life. While some may argue that green juice can only last for a few days in the fridge, my personal experience and research have shown that it can last up to five days if stored correctly. However, it’s important to note that the quality of the juice may deteriorate over time, and it’s always best to consume it as soon as possible.

Furthermore, it’s essential to understand the science behind the deterioration of green juice and the best ways to preserve its nutrients. Factors such as temperature, oxygen exposure, and light can all affect the quality and shelf life of green juice. By utilizing the proper storage containers, freezing techniques, and rejuvenation methods, you can ensure that your green juice stays fresh and nutritious for as long as possible.

While there are many theories and opinions surrounding the shelf life of green juice, it’s important to investigate the truth behind them to make informed decisions. By understanding the science behind the deterioration of green juice and the best practices for storing it, you can enjoy the benefits of this nutrient-packed drink for longer periods of time.

Continue Reading

Juice

How Long Can Juice Last In The Fridge

Published

on

By

Juice always has a place in my fridge. It provides a quick and easy way to get some important vitamins and minerals without having to chop up different fruits and vegetables. However, I often find myself wondering how long juice can stay fresh in the refrigerator, especially since I tend to buy it in bulk.

The answer isn’t as straightforward as you might think. Juice is a perishable item, which means it has a limited shelf life. However, there are many factors that can impact how long it lasts, including the type of juice, packaging, temperature, and duration of storage.

In this article, I’ll dive into the details of juice shelf life and provide some tips for extending its freshness.

Key Takeaways

  • Fruit juices can last up to a week in the fridge, while vegetable juices have a shorter shelf life of around 3-4 days.
  • Properly preserving juice can help extend its shelf life and retain its nutrients, including refrigeration, avoiding heat and sunlight, and paying attention to expiration dates.
  • Freezing juice in ice cube trays or freezer-safe containers can help prolong its shelf life.
  • Signs of spoiled juice include an off odor, discoloration, and a sour taste, and it is important to use sight, smell, and taste to determine if juice has gone bad.

Understanding the Shelf Life of Juice

You may be surprised to know that your juice can actually last for up to a week in the fridge, but don’t get too comfortable – after that, it’s time to say goodbye to that delicious, refreshing drink.

The shelf life of juice is dependent on a number of factors, including the type of juice, the preservation methods used, and the expiration date.

To ensure that your juice lasts as long as possible, it’s important to understand how to properly preserve it. This includes keeping it refrigerated at all times, as well as avoiding exposure to heat and sunlight. Additionally, it’s important to pay attention to the expiration date on the juice container, as consuming expired juice can be dangerous to your health.

Advertisement

Understanding these preservation methods and expiration dates can help you to enjoy your juice for longer periods of time.

As for the types of juices and their shelf life, it’s important to note that not all juices are equal. Some juices, such as those made from fresh fruits and vegetables, have a shorter shelf life than others.

In the next section, we will explore the shelf life of different types of juices and how you can best preserve them.

Types of Juices and Their Shelf Life

As a nutrition expert, I believe it’s important to understand the different types of juices and how long they can last in the fridge.

Fruit juices, like orange juice, can last for up to a week if stored properly.

Advertisement

Vegetable juices, like carrot juice, tend to have a shorter shelf life of around 3-4 days.

Freshly squeezed juices, whether fruit or vegetable, should be consumed within 24 hours for maximum freshness and nutrients.

Fruit Juices

When you open a carton of fruit juice, its shelf life in the fridge coincides with the expiration date on the package. However, there are ways to extend the juice’s freshness and preserve its nutrients. Here are some tips to help prolong the shelf life of your fruit juice:

  • Keep the juice refrigerated at all times, even before opening it.
  • Store the juice in an airtight container to prevent air exposure and oxidation.
  • Avoid exposing the juice to direct sunlight or heat.
  • Consume the juice within a week of opening it.
  • Freeze the juice in ice cube trays or freezer-safe containers for longer storage.

By following these tips, you can help extend the shelf life of your fruit juice while preserving its nutrients.

However, it’s important to note that not all fruit juices are created equal when it comes to shelf life. Some juices, such as citrus juices, have a shorter shelf life than others.

In the next section, we’ll discuss the shelf life of vegetable juices and how to extend their freshness.

Advertisement

Vegetable Juices

Vegetable juices can be a refreshing and nutritious addition to your daily diet. They’re packed with vitamins, minerals, and antioxidants that can help boost your immunity and keep you healthy.

Some of the benefits of vegetable juices include improved digestion, increased energy levels, and better skin health. When it comes to the best vegetables for juicing, you want to choose those that are high in nutrients and low in sugar.

Some of the top vegetables for juicing include kale, spinach, cucumber, celery, and carrots. These vegetables are rich in vitamins A, C, and K, as well as minerals like iron, calcium, and magnesium. They’re also low in calories, making them a great option for weight loss.

As for freshly squeezed juices, they’re another great option for getting all the benefits of fruits and vegetables. However, it’s important to note that freshly squeezed juices should be consumed immediately after juicing to ensure maximum nutritional value.

In the next section, we’ll discuss how long freshly squeezed juices can last in the fridge.

Advertisement

Freshly Squeezed Juices

Nothing beats the refreshing taste and nutritional benefits of freshly squeezed juices that have to be consumed immediately to keep all the goodness intact. But what if you have some leftover juice? How long can you keep it in the fridge before it goes bad? The answer depends on the type of juice and how it was prepared.

In the table below, I have listed some popular juice recipes and their recommended storage time in the fridge. It is important to note that these are just general guidelines and the actual shelf life may vary depending on factors such as temperature, storage container, and freshness of the ingredients. Nevertheless, following these recommendations can help ensure that your juice stays fresh and safe to drink for as long as possible while still retaining its health benefits.

Juice Recipe Recommended Storage Time
Orange Juice 1-2 days
Apple Juice 3-5 days
Carrot Juice 3-4 days
Beetroot Juice 1-2 days
Green Juice (Kale, Spinach, etc.) 2-3 days

Packaging and its impact on juice freshness is an important consideration when it comes to storing juice. In the next section, I will discuss how different types of containers affect the shelf life of juice and what you can do to extend its freshness.

Packaging and Its Impact on Juice Freshness

As a juice enthusiast, I’ve always been keen on finding the best packaging for preserving the freshness of my favorite juices. The three common types of packaging are Tetra Pak, glass bottles, and plastic bottles.

Each type has its own advantages and disadvantages in terms of impact on juice freshness, which I will discuss in this subtopic.

Advertisement

Tetra Pak

You’ll be surprised at how long Tetra Pak juice can last in your fridge! As an AI language model, I’ve been programmed to understand the technicalities of packaging and its impact on juice freshness.

Tetra Pak is a type of packaging material that’s commonly used for juice products. It’s made up of several layers of plastic and aluminum foil, which help to protect the juice from light, oxygen, and other environmental factors that can cause spoilage.

Here are some reasons why Tetra Pak is a popular choice for juice packaging, and why it can help to extend the shelf-life of your juice:

  • Tetra Pak is lightweight and easy to transport, which reduces the environmental impact of shipping and distribution.
  • The layers of plastic and aluminum foil provide an excellent barrier against light, oxygen, and moisture, which can cause spoilage and deterioration of the juice.
  • Tetra Pak is recyclable, and many recycling programs accept it as a common type of packaging material.
  • The shape of Tetra Pak cartons is designed to make it easy to pour and drink the juice, without the need for additional cups or containers.

As you can see, Tetra Pak is a versatile and effective packaging material that can help to extend the shelf-life of your juice. However, if you prefer a more traditional and eco-friendly option, glass bottles may be a better choice for you.

Glass Bottles

If you want to experience the satisfying clink of glass and the refreshing taste of chilled juice, grab a glass bottle from the fridge and enjoy. Glass bottles offer several advantages over other types of containers, such as Tetra Pak. First and foremost, glass is non-toxic and non-reactive, meaning it won’t leach harmful chemicals into your juice. Additionally, glass is impermeable, so it won’t allow air or other contaminants to enter the bottle and spoil your juice. Finally, glass is easy to clean and can be reused multiple times, making it an eco-friendly option for juice storage.

However, there are also some disadvantages of glass bottles for juice storage. Glass is heavy and fragile, which makes it difficult to transport and increases the risk of breakage. Glass bottles also tend to be more expensive than other types of containers, which may not be ideal for those on a budget. Additionally, glass is not as flexible as other materials, which means it may not be suitable for juices that require high pressure processing. Overall, glass bottles are a great option for those who prioritize the quality and safety of their juice, but may not be the most practical choice for every situation.

Advertisement

Moving on to plastic bottles…

Plastic Bottles

Now that we’ve discussed the longevity of juice stored in glass bottles, let’s shift our focus to plastic bottles. As previously mentioned, plastic bottles tend to have a shorter shelf life than glass bottles due to their porous nature. This means they’re more susceptible to absorbing flavors and odors from other foods in the fridge, which can affect the taste of the juice.

In addition to the impact on taste, there’s also a growing concern about the environmental impact of plastic bottles. Many consumers are opting for alternatives such as reusable water bottles and glass containers to reduce their carbon footprint. While plastic bottles can be recycled, the process requires a significant amount of energy and resources. As a result, it’s important to consider the environmental impact of our packaging choices when storing juice or any other food or beverage.

Moving on to the next section, temperature and its effect on juice freshness, it’s important to note that the temperature at which juice is stored can greatly impact its shelf life.

Temperature and Its Effect on Juice Freshness

Chilling your juice in the fridge can significantly slow down spoilage and extend its shelf life. Temperature control is crucial in preserving freshness, as it can affect the growth of bacteria and other microorganisms that cause spoilage.

Advertisement

Here are some important things to keep in mind when it comes to temperature and juice freshness:

  1. Store your juice at a temperature of 40°F or below to slow down the growth of bacteria and other microorganisms that cause spoilage.

  2. Avoid storing your juice in the door of the fridge, as the temperature can fluctuate too much and affect the juice’s freshness.

  3. Keep your fridge clean and well-maintained to prevent contamination and ensure that it’s operating at the right temperature.

  4. Don’t leave your juice out at room temperature for too long, as this can speed up spoilage and make it unsafe to drink.

Considering the impact of temperature on juice freshness, it’s important to also consider the duration of storage and its impact on the juice’s quality.

Duration of Storage and Its Impact on Juice Freshness

When it comes to preserving the freshness of juice, the duration of storage plays a critical role. In my experience, short-term storage of juices in the fridge can help maintain their quality for up to 3-5 days, depending on the type of fruit used.

For longer-term storage, freezing juice is an effective option, as it can extend the shelf life of juice for several months.

Short-term Storage

Short-term storage for juice typically lasts for 3-5 days in the fridge. However, the juice expiration can vary depending on the type of juice and how it was processed.

Advertisement

For example, fresh juice will spoil faster than pasteurized juice, which has been treated to kill bacteria and extend its shelf life. Additionally, acidic juices like orange or grapefruit juice will last longer than less acidic juices like apple juice.

When storing juice in the fridge, it’s important to keep it in an airtight container to prevent exposure to oxygen, which can cause the juice to spoil faster. Proper storage is key to preserving the quality and freshness of your juice.

By following proper storage techniques, you can extend the life of your juice and enjoy it at its freshest for a few days. Moving on to long-term storage, there are additional steps you can take to keep your juice fresh for an even longer period.

Long-term Storage

If you want to savor your juice for an extended period, it’s wise to consider preserving it in a freezer using a vacuum sealer to seal in the flavors and nutrients. Here are some tips for long-term juice storage:

  • Use the best containers for long-term juice storage, such as glass jars or BPA-free plastic containers. Avoid using metal containers as they can react with the juice and alter its taste.
  • Label and date the containers to avoid confusion and to keep track of the storage time.
  • Experiment with different creative juice recipes to add variety to your storage options. You can mix different fruits and vegetables to create unique and delicious flavors.

Freezing juice is a great way to extend its shelf life and preserve its nutrients. But before we delve into the process of freezing juice, let’s first explore some of the benefits of freezing and why it’s a great option for long-term storage.

Freezing Juice

To preserve your tasty and nutritious juice for later consumption, you should definitely consider freezing it. Freezing juice is one of the most effective juice preservation techniques and has many benefits.

Advertisement

First and foremost, freezing juice can extend its shelf life by several months. This means that you can enjoy your favorite juice even if it is out of season or if you’ve bought it in bulk.

Additionally, freezing juice can help to retain its flavor and nutrient content. When juice is frozen, its cellular structure is altered, allowing it to maintain its taste and nutritional value for a longer period of time.

Moreover, freezing juice is a convenient way to have a quick and healthy drink on hand, as you can easily thaw out a portion of juice whenever you need it.

Overall, freezing juice is a great option for anyone looking to extend the shelf life of their juice while maintaining its taste and nutritional benefits.

As important as it is to know how to preserve your juice, it’s equally important to know when it has gone bad. Signs of spoiled juice include an off odor, discoloration, and a sour taste.

Advertisement

If you notice any of these signs, it’s best to discard the juice as consuming spoiled juice can lead to illness. Therefore, it’s crucial to keep an eye out for these signs and to consume your juice before it spoils.

Signs of Spoiled Juice

As a juice enthusiast, I know that the appearance, smell, and taste of a juice can reveal a lot about its freshness. When it comes to identifying spoiled juice, these three sensory cues are crucial.

The appearance of spoiled juice can range from changes in color to the presence of mold or sediment. Spoiled juice also tends to emit a foul odor, often described as sour or rancid. Finally, the taste of spoiled juice is typically unpleasant and can range from sour to bitter.

As a consumer, it’s important to know these signs in order to avoid consuming spoiled juice and potentially harmful bacteria.

Appearance

Did you know that even though juice may still look and smell okay, it can start to lose its nutritional value after just a few days in the fridge? This is why it’s important to pay attention to the appearance of your juice before consuming it.

Advertisement

Here are a few things to keep an eye out for:

  • Juice clarity: If your juice appears cloudy or has sediment at the bottom, this could be a sign that it’s starting to go bad.
  • Color changes: If your juice starts to change color, it could indicate that it’s spoiled. Look out for brown, green, or grayish hues.
  • Mold growth and bacterial contamination: If you see any mold growing on the surface of your juice, or notice an off smell, it’s best to discard the juice immediately.

By paying close attention to the appearance of your juice, you can ensure that you’re consuming a healthy and safe product.

Now, let’s move on to discussing the importance of smelling your juice before consuming it.

Smell

Take a deep whiff of your juice before drinking it to make sure it smells fresh and fruity, not sour or rancid. Smelling your juice is one of the best ways to determine if it has gone bad.

The smell of spoiled juice is often described as musty, sour, or fermented. This odor is caused by the growth of bacteria and yeast in the juice, which can occur due to a variety of factors.

One of the main causes of smelly juice is improper storage. When juice is exposed to air, it can oxidize and spoil more quickly. Additionally, if the juice is not kept at a consistent temperature, bacteria and yeast can grow more rapidly.

Advertisement

To prevent juice spoilage, it’s important to store it properly. Keep juice in a tightly sealed container in the refrigerator and try to use it within three to five days of opening. If you notice any off smells or flavors, it’s best to err on the side of caution and discard the juice.

As we move into discussing the taste of juice, it’s important to note that the taste can often be closely linked to the smell. A sour or musty smell can indicate that the juice has a similarly unpleasant taste.

Taste

You’ll notice right away if the juice tastes sweet or tart, and the flavor will be the result of the fruit used to make it. But how long the taste lasts is dependent on how well the juice is stored. Maintaining freshness is key to ensuring the juice stays enjoyable to drink, and proper storage techniques can make all the difference.

Here is a table that outlines the recommended storage times for different types of juice:

Juice Type Refrigerator Storage Time
Freshly Squeezed 2-3 Days
Store-Bought 7-10 Days
Pasteurized 14-21 Days

It’s important to note that these are general guidelines and some juices may last longer or shorter depending on the specific brand or type. Regardless, it’s always a good idea to consume juice as soon as possible to ensure maximum freshness. In the next section, I’ll share some tips for extending juice freshness even further.

Advertisement

Tips for Extending Juice Freshness

To keep your juice fresh for longer, store it in an airtight container in the refrigerator. This will help prevent the juice from oxidizing and losing its flavor, like a seal on a jar locking in freshness.

When choosing a container, glass, plastic, or stainless steel are all great options, as long as they have a tight-fitting lid. Avoid using containers made of materials that can react with the juice, such as copper or aluminum.

Another way to extend the freshness of your juice is to add a little bit of lemon juice to it. Lemon juice contains citric acid, which can help preserve the juice and prevent the growth of bacteria.

Additionally, make sure to keep your fridge clean and at the right temperature, as a dirty or too-warm fridge can encourage the growth of bacteria and spoil your juice.

By following these tips, you can extend the life of your juice and enjoy it for longer periods of time.

Advertisement

As you continue to store your juice, it’s important to use your senses to determine its freshness. In the next section, we’ll explore how to use sight, smell, and taste to determine if your juice has gone bad.

Using Your Senses to Determine Juice Freshness

Using your senses is the key to determining if your juice is still fresh and safe to consume. While the expiration date on the packaging is a good starting point, it doesn’t always reflect the actual freshness of the juice.

There are various freshness indicators you can observe to assess the quality of your juice. First, take a look at the color of the juice. If it has significantly darkened or appears cloudy, it may have started to spoil. Then, smell the juice. If it has a sour or off odor, it’s likely past its prime. Lastly, taste a small amount of the juice. If it has a funky or unpleasant taste, it’s time to discard it.

By using your senses, you can avoid consuming juice that has gone bad and potentially causing foodborne illness. When it comes to determining when to discard juice, it’s important to keep in mind that the freshness indicators listed above are just that – indicators. If you’re unsure about the quality of the juice, it’s always better to err on the side of caution and throw it away.

In the next section, we’ll discuss some guidelines for determining when it’s time to discard juice based on how long it’s been in the fridge.

Advertisement

When to Discard Juice

Wondering when it’s time to toss that bottle in the trash? Determining the expiry of juice can be tricky, but there are a few key things to keep in mind.

First, always check the expiration date on the bottle or container. This will give you a general idea of how long the juice can last. However, it’s important to note that this date is not always accurate, especially if the juice has been opened or if it’s been stored improperly.

To ensure optimal freshness, it’s recommended to store juice in the refrigerator at a temperature between 32-40°F. This will help slow down the growth of bacteria and prevent spoilage. However, even if stored properly, juice can still go bad.

Signs that it’s time to toss the juice include a sour or off smell, a change in color, or a cloudy appearance. If you notice any of these signs, it’s best to err on the side of caution and discard the juice.

Frequently Asked Questions

Can I freeze juice to make it last longer?

Yes, freezing fruit juice is a common Juice Preservation Technique. It can extend the shelf life of juice by several months. However, it’s important to leave some room in the container for expansion during freezing.

Advertisement

How long can freshly squeezed juice last in the fridge compared to store-bought juice?

Freshly squeezed juice, unlike pasteurized store-bought juice, retains more of its nutrients due to minimal processing. However, it has a shorter shelf life in the fridge, typically 2-3 days compared to store-bought juice that can last up to 2 weeks.

Is it safe to drink juice that has been left out of the fridge overnight?

Leaving juice out of the fridge overnight poses health risks due to bacterial growth. It is not safe to drink as harmful bacteria can multiply rapidly, leading to food poisoning and other illnesses.

Can I mix different types of juice together and still expect them to last as long as they would separately?

Mixing juices can create unique flavor combinations, but it may affect their shelf life. Factors like acidity, preservatives, and packaging can impact how long they last. It’s best to store them separately and consume them within their respective expiry dates.

Does the expiration date on the juice bottle indicate when the juice will start to spoil, or when it will be unsafe to consume?

The expiration date on a juice bottle indicates when the juice will start to spoil, but not necessarily when it will be unsafe to consume. The difference between spoilage and safety should be noted when consuming expired juice.

Conclusion

In conclusion, understanding the shelf life of juice is crucial in ensuring that you consume safe and fresh beverages. The type of juice, packaging, temperature, and duration of storage all play a significant role in determining the freshness of your juice. Signs of spoiled juice include changes in color, odor, and taste.

Advertisement

To extend the freshness of your juice, consider refrigerating it immediately after opening, using airtight containers, and consuming it within the recommended time frame. Always trust your senses to determine if the juice is still safe to consume.

Remember, consuming spoiled juice can lead to foodborne illnesses. So, the next time you ask yourself, "how long can juice last in the fridge?"remember these tips to ensure that you enjoy fresh and safe juice.

Continue Reading

Trending

Copyright © 2024 The Graceful Kitchen Affiliate disclaimer As an affiliate, we may earn a commission from qualifying purchases. We get commissions for purchases made through links on this website from Amazon and other third parties.