
In the world of cooking and baking, lemon juice is a key ingredient known for adding a tangy, acidic flavor to many dishes. However, a common query is about how much juice can be squeezed from half a lemon.
As a professional chef, I have experimented with various lemon varieties, juicing techniques, and measuring methods to find the most accurate answer to this question.
In this article, I will share my findings on how much juice can be obtained from half a lemon. I will also provide tips on how to equip yourself for juicing, prepare the lemon, measure the juice, and adjust for recipe needs. Additionally, I will discuss the benefits of using lemon juice in recipes and provide tips for storing leftover juice.
Whether you are a seasoned cook or a novice in the kitchen, this article will provide valuable insights on how to make the most out of your lemons.
Key Takeaways
- The amount of juice obtained from half a lemon can vary depending on the freshness of the lemon and the method used to extract the juice.
- Half a lemon typically yields about 1-2 tablespoons of juice, depending on its size and ripeness.
- To ensure accurate measurements, it’s recommended to use a juicer or a measuring cup with markings for lemon juice.
- Different varieties of lemons have unique tastes and aromas, making them ideal for different culinary applications.

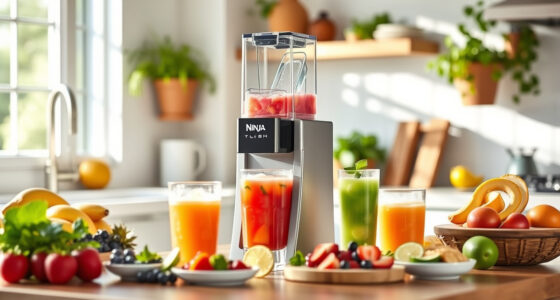
Elite Gourmet ETS623 Electric Citrus Juicer, 24 oz, Black/Stainless Steel
- Powerful Motor: 40W for faster juicing
- Large Capacity: 24oz (3 cups) for batch juicing
- Efficient Extraction: Auto-reversing reamer for more juice
As an affiliate, we earn on qualifying purchases.
As an affiliate, we earn on qualifying purchases.
Understanding Lemon Varieties
Do you know that there are different varieties of lemons, each with its unique taste and aroma? Lemon cultivation has been practiced for centuries, and today, there are various types of lemons grown worldwide. The most common types include Eureka, Lisbon, Meyer, and Ponderosa, among others.
Each type of lemon has unique characteristics that make them ideal for different culinary applications, including juicing. When it comes to juicing lemons, the type of lemon you choose matters. For instance, Eureka and Lisbon lemons are known for their high acidity, making them ideal for use in savory dishes, such as marinades and dressings. On the other hand, Meyer lemons have a sweeter taste and lower acidity, making them perfect for use in desserts and sweet drinks.
Additionally, lemons are a rich source of vitamin C and antioxidants that help to boost immunity and reduce the risk of chronic diseases. Equipping yourself for juicing is easy, and all you need is a few tools and the right approach.
Equipping Yourself for Juicing
Get ready to unleash your inner juicing master by arming yourself with the necessary tools and knowledge. Before you start juicing, it is important to have the right equipment. A citrus juicer is the most efficient tool for extracting juice from a lemon. It is designed to separate the juice from the pulp and seeds, resulting in a smooth and consistent texture. You can also use a manual juicer or a reamer, but they require more effort and may not yield as much juice.
Once you have your juicing equipment, it’s time to think about lemon juice applications. Lemon juice is a versatile ingredient that can be used in a variety of ways, from adding flavor to dishes to providing health benefits. It can be used as a marinade for meat or fish, added to salad dressings, or used to flavor cocktails. Lemon juice can also be used as a natural remedy for sore throats and digestive issues. With so many uses, it’s no wonder that lemon juice is a kitchen staple. Now that you have your equipment and know the possibilities, let’s move on to preparing the lemon.
Preparing the Lemon
Before you start juicing your lemon, make sure to wash it thoroughly to remove any dirt or bacteria on the skin. Choosing ripe lemons is also important as they contain more juice and are easier to squeeze.
When selecting lemons, look for ones that are heavy and have a smooth, bright yellow skin. Avoid lemons that have soft spots or are discolored as they may be overripe or spoiled.
After washing and selecting your lemon, it’s important to remove any seeds before juicing. Cut the lemon in half and use a small spoon or knife to carefully remove any visible seeds. Alternatively, you can also use a strainer or cheesecloth to strain the juice after squeezing. By removing the seeds, you can avoid any unwanted bitterness in your juice.
Once you’ve prepared your lemon, you’re ready to move on to squeezing techniques for extracting the maximum amount of juice.
Squeezing Techniques
When it comes to squeezing lemon juice, there are three techniques I typically use: hand-squeezing, using a citrus press, and using a fork or tongs.
Hand-squeezing is the most traditional and straightforward method, but it requires a bit of strength and can potentially leave seeds in the juice.
A citrus press is a great alternative, as it allows for easy and efficient juicing.
Using a fork or tongs can be useful in a pinch when no other tools are available.
Hand-squeezing
As I grip the lemon like a stress ball, I can feel the tension in my hand. Hand-squeezing requires a certain amount of hand strength to effectively extract the juice. If you find that your hands aren’t strong enough, there are juicing alternatives available, such as using a citrus press or juicer.
When hand-squeezing, it’s important to apply even pressure to the lemon. This will ensure that the juice is extracted evenly and efficiently. As you gently squeeze the lemon, you should start to see the juice flow out.
Typically, half a lemon will yield about 1-2 tablespoons of juice, depending on its size and ripeness. If you need more juice, simply repeat the process with another half of a lemon or try using a citrus press for a more efficient and consistent extraction.
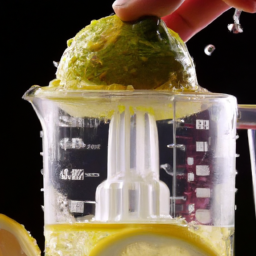
Using a citrus press
To make your life easier, try using a citrus press instead of hand-squeezing the lemon. Citrus press alternatives are widely available and can easily be found in kitchen stores or online.
Using a citrus press ensures that you get the maximum amount of juice from the lemon without any pulp or seeds. The benefits of fresh lemon juice can’t be overstated; it’s a great source of vitamin C, which helps boost immunity and fight common colds. It also aids in digestion and detoxification of the body.
By using a citrus press, you can easily extract all the juice from the lemon without having to put in extra effort. Using a fork or tongs may not be as effective and may result in less juice.
Using a fork or tongs
Using a fork or tongs may seem like a quick fix for lemon juicing, but nothing compares to the satisfaction of a perfectly squeezed lemon with all the tangy goodness bursting out.
When using a fork, the first step is to cut the lemon in half and pierce it with the fork, twisting it back and forth to release the juice. This method can be effective for small amounts of juice, but it requires a lot of effort and can cause the pulp and seeds to mix with the juice.
Tongs can also be used to squeeze lemon juice, but it requires a bit more skill. The key is to hold the lemon firmly between the tongs and twist them in opposite directions to release the juice. This method can be more efficient than using a fork, but it also requires more strength and precision. Ultimately, the choice between using a fork or tongs depends on personal preference and the amount of juice needed.
When it comes to measuring the juice, it’s important to note that the amount of juice obtained from half a lemon can vary depending on the size and ripeness of the fruit. To ensure accurate measurements, it’s recommended to use a juicer or a measuring cup with markings for lemon juice.
Measuring the Juice
You can squeeze about 1 tablespoon of juice from half a lemon. There are a few factors that can affect how much juice you can extract, such as the freshness of the lemon and the method used to extract the juice. A fresh lemon will yield more juice than an old one, so it’s important to use a lemon that is firm and heavy for its size.
When it comes to juice extraction, there are a few methods you can use. One is to simply squeeze the lemon with your hand, either over a bowl or a juicer. Another is to use a citrus press, which can help to extract more juice with less effort. However, no matter which method you choose, it’s important to remember to roll the lemon on a hard surface before juicing it. This helps to break down the membranes inside the lemon and makes it easier to extract the juice.
To adjust for recipe needs, you can simply multiply or divide the amount of juice needed by the number of lemons required. For example, if a recipe calls for 2 tablespoons of lemon juice and you only have one lemon, you can squeeze the juice from half the lemon and adjust the other ingredients accordingly.
With these tips in mind, you can confidently measure out the perfect amount of lemon juice for all your culinary needs.
Adjusting for Recipe Needs
Don’t worry if you only have one lemon on hand, simply squeeze the juice from one half and adjust the recipe accordingly. Recipe customization is a common practice in cooking, and it’s important to know how to adjust ingredients to suit your needs.
If a recipe calls for a whole lemon and you only have half, you can use that half and reduce the amount of other liquids in the recipe. Alternatively, if a recipe calls for lemon juice and you don’t have any fresh lemons, you can use bottled lemon juice, but be aware that the flavor may not be as fresh.
Lemon juice preservation is also an important consideration when adjusting recipes. If you only need half a lemon’s worth of juice, it’s important to preserve the other half so it doesn’t go to waste. One way to do this is to store the unused half in a ziplock bag in the fridge. Another option is to squeeze the juice from the other half and freeze it in an ice cube tray for later use.
By taking these simple steps, you’ll be able to customize recipes to your liking while also minimizing waste. So, what should you do if you have leftover lemon juice?
Storing Leftover Juice
To properly store any remaining lemon juice, it’s advised to transfer it to a tightly sealed bottle or container and refrigerate it promptly.
One of the best ways to preserve lemon juice is to freeze it. To do so, pour the juice into an ice cube tray and freeze until solid. Once the cubes are frozen, transfer them to a freezer-safe bag or container and use them as needed. This method is especially useful when you have an excess of lemon juice and don’t want it to go to waste.
Another way to preserve lemon juice is to mix it with a bit of salt or sugar. This will help to prevent the growth of bacteria and keep the juice fresh for longer. However, it’s important to note that this method may alter the taste of the juice.
When using lemon juice in recipes, it’s important to consider the preservation method used and adjust the amount of juice accordingly. With these tips, you can ensure that your leftover lemon juice doesn’t go to waste and can be used in various recipes.
Using Lemon Juice in Recipes
When incorporating lemon juice into your recipes, it adds a tangy and refreshing flavor that can enhance the taste of various dishes. There are numerous creative ways to use lemon juice in cooking, and it can be added to everything from marinades to desserts.
Here are a few examples of how I like to use lemon juice in my cooking:
- Squeezing a little lemon juice over fish before baking or grilling it can give it a bright, fresh flavor.
- Adding lemon juice to a vinaigrette can provide a tangy contrast to the oil and make it more refreshing.
- Incorporating a little lemon juice into a fruit salad can make the flavors pop and prevent the fruit from turning brown.
By using lemon juice in these ways, you can take your dishes to the next level and add a touch of zing to your favorite recipes.
As we’ve seen, lemon juice is a versatile ingredient that can be used in many different ways. In addition to its culinary uses, there are also many benefits to drinking lemon water, such as aiding digestion and boosting immunity.
We’ll explore these benefits further in the next section.
Benefits of Lemon Juice
Now that we know how to use lemon juice in recipes, let’s talk about the benefits of incorporating this citrus fruit into our diet.
Lemon juice is a great source of vitamin C, which is essential for a healthy immune system. It also contains antioxidants, which help to protect our cells from damage caused by free radicals.
Aside from its nutritional benefits, lemon juice can also be used for various purposes around the house. It can be used as a natural cleaner, as its acidic properties help to remove stains and grime. It can also be used as a natural air freshener, as its refreshing scent can help to eliminate odors.
Overall, incorporating lemon juice into our lifestyle can provide a range of benefits and uses beyond just its delicious taste in recipes.
Frequently Asked Questions
Can you use bottled lemon juice instead of fresh juice?
I highly recommend using fresh lemon juice instead of bottled for its superior taste and nutritional benefits. To properly store fresh juice, seal it in an airtight container and refrigerate for up to a week.
How long does it take for a lemon to go bad?
A lemon’s lifespan is like a ticking clock – it eventually expires. To preserve them, try freezing them, pickling them, or storing them in a cool, dry place. Signs of spoilage include mold, softness, and a sour odor.
Is it better to use a manual juicer or an electric juicer for lemons?
In my experience, an electric juicer yields more juice than a manual juicer for lemons. The temperature of the lemon does not significantly affect juice yield. However, proper storage and freshness of the lemon can impact juice output.
Can you freeze freshly squeezed lemon juice?
Yes, freshly squeezed lemon juice can be frozen. Proper freezing procedures involve storing the juice in an airtight container and labeling with the date. The shelf life of frozen lemon juice is 4-6 months.
Can you substitute lime juice for lemon juice in recipes?
Hey there! When it comes to cocktails, substituting lime juice for lemon juice can add a refreshing twist. However, in salad dressings, the different flavor profiles may not be interchangeable. It’s important to consider the recipe before making any substitutions.
Conclusion
Well, folks, we’ve made it to the end of our lemon juice journey. After all that squeezing and measuring, we’ve finally got our precious juice, ready to be used in a variety of recipes.
But let’s not forget the benefits of lemon juice – it’s not just a tasty addition to our meals, it also has a range of health benefits, from aiding digestion to boosting our immune system.
So, whether you’re using lemon juice to add a zesty kick to your salads, or to give your morning water a healthy boost, make sure to keep those lemons on hand and ready to go.
And who knows, with all this newfound knowledge, you might even be inspired to try juicing some other citrus fruits too. Cheers to a fresh and healthy lifestyle!